
So, last time, we looked into the early years of Australia’s only ever Field Marshall, Thomas Blamey. From his admittedly sterling service in the Great War to his less than admirable service as Victoria Police Commissioner. This time around we’ll look at his time as the top dog in Australia’s World War II involvement and see if we can come up with some kind of summary of just who this bloke was.
In 1937 after nearly four decades in the military, Blamey relinquished command of the 3rd (Militia) Division, which he had held for six years, and went on the Unattached List. He did however retain the support of many of the country’s top leaders, one Robert Menzies in particular. He became a radio broadcaster following international affairs and was appointed chairman of the government’s Manpower Committee, which as best as I can figure was all about preparing for the creation of a second AIF if the need should ever arise.
On 5 April 1939, Blamey married for the second time, his first wife having died, and life just plodded along until September 1939, which as we all know is when World War Two started, in Europe anyway.
Blamey was quickly squeezed back into his uniform and was promoted to Lieutenant General on 13 October and given command of the newly formed 6th Division. In World War 2, the Australian Divisions started at 6. The five divisions of World War 1 would remain distinct, and their reputations intact in the event of the new divisions not coming up to scratch.
In early 1940, the 7th Division was raised, and the two Divisions were joined into a Corps. This Corps, known as I Corps, required a Corps commander and that job was given to Blamey. Although only a single Corps at this stage, it was basically command of the second AIF that he had been handed. In choosing his Brigade Commanders, Blamey had a preference for commanders with proven experience from World War 1, including his good friend Stan Savige. This didn’t go down too well with many of the graduates of Australia’s officer training school, Duntroon, who felt that the old blokes still had their heads stuck in 1918 and didn’t have an understanding of the technological developments of the past twenty years.
These graduates probably had some justification. The Militia which most of these old blokes had commanded during the inter-war years were far from finely honed fighting men. But Blamey knew them and knew they could be trusted in battle. As things went on the command structure evened itself out with a pretty good balance of steady older hands and more educated younger minds, but there was always a rivalry between them.
Blamey landed in Palestine on 20 June 1940. The 16th Brigade had already arrived, and the 17th followed not long after them. The 18th Division was diverted to France but arrived too late to take part in the fighting that left the British army on the beaches of Dunkirk. Two days after arriving, Blamey reported to the British Commander in Chief, Middle East, General Wavell and set about finding something for the Australians to do.
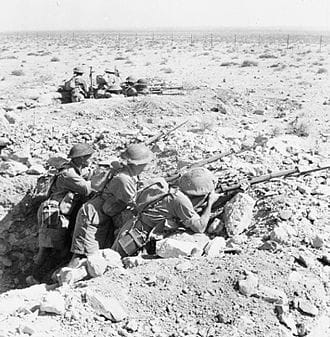
Wavell had a large offensive planned against the Italians in Libya for December. At this stage, there were no German forces in North Africa, so it was just the Poms versus the Italians. Blamey agreed to attach the 6th Division to Wavell’s Western Desert Force where they would take part in their first battles of the war against the town of Bardia and then onto Benghazi.
So far so good for Blamey and the new diggers. But then came Greece and Crete. Due to events which I covered in the episode on Thermopylae, Wavell ordered Blamey to take I Corps to Greece. Blamey had been around long enough to know this wasn’t going to end well. But despite his reservations he kept quiet and the only disagreement he raised with Wavell was in relation to which Division he would send. Wavell reckoned the 7th should go first and then the 6th should follow. But Blamey felt that with the experience gained at Bardia and Benghazi, the 6th Div was the better option with the 7th to follow up.
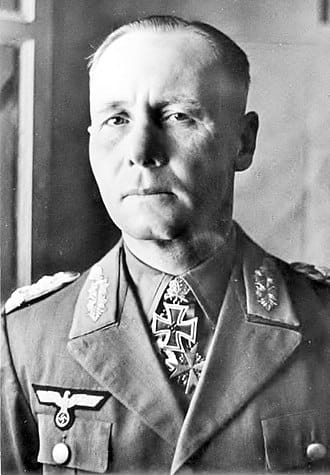
Not that Blamey can be held responsible for what would happen in North Africa while he and the 6th and 7th Divisions were in Greece, but he left behind the 9th Division to hold the ground taken from the Italians. What happened was, Erwin Rommel arrived with the Afrika Corps and smashed their way back to Tobruk. But that’s another story.
With all the confidence in the world of their eventual success, Blamey scoured the beaches for likely evacuation points soon after his arrival. This would soon prove to be a wise bit of forethought. The Greek campaign was a disaster and pretty soon those evacuation beaches would be in full swing, evacuating the Australian, New Zealand and British troops that had been thrown into a hopeless cause.
Not quite done with hopeless causes though, it was decided these men would be evacuated to the island of Crete. I’ll be covering that Battle in a future episode, so I won’t go into it here, but spoiler alert, the defenders were soon being evacuated from Crete as well.
No one could blame him for the outcome of the Greek and Crete campaigns. In fact, he knew they were lost causes but still gave it everything he had. But, in the evacuation of Greece, his integrity was again called into question.
With the troops on the beaches being rowed out to the waiting ships, one last plane was available for the removal of the senior officers. There was one spare seat. But who to give it to? A list of officer’s names were read to out Blamey one by one. Each was dismissed by Blamey for various reasons, ‘he’s needed to coordinate the evacuation’, or ‘he’s needed to carry out demolitions’, etc etc. All the way down to when there was but one officer left.
“Oh well, you might as well give it to young Tom.” Blamey said.
The young Tom in question was young Thomas Blamey, his son. Well may you say, he’s just a father protecting his son as any father would. But the point is, Blamey Senior was responsible for many people’s sons, and by eliminating any of those on the list above his own, he condemned those other sons to death or capture.
But any father would’ve done the same in that position, you may again say. But no. The Commander of the New Zealand Forces, one Bernard Freyberg VC, had a son on Crete under his command. He too, had an opportunity to save his son over others. But he realised that with the position of commander, he couldn’t show preference to his own son and so he chose an officer of more importance to the overall operation.
Again, to me, that’s a big black mark against Blamey.
So, anyway.
After bailing out of Greece, while the evacuated forces headed for another desperate stand at Crete, Blamey was ordered to return to Cairo. When he lobbed in Cairo, he was told that he’d been appointed Deputy Commander in Chief, Middle East. This was because some heads had rolled due to the Greek fiasco, but also because of practicality. Australian forces were now spread throughout the Middle East and Mediterranean Theatres. It made overall command easier to have an Australian high up the pecking order to coordinate the AIF efforts.
At that point he had 6th Division on Crete, about to bear the brunt of the German invasion. The 7th Division was in Syria operating against the Vichy French and the 9th was still holding out in its valiant defence of Tobruk. Each battleground held its own concerns.
On 20 May 1941 the Germans attacked Crete. Initially the defenders exacted a heavy toll on the German paratroopers, but the Germans just kept coming and an unfortunate communication breakdown handed them the main airfield on the island. Once they had that, they could fly in ground troops and the game was up. Blamey’s only option was to order another evacuation.
In Syria, command of operations was handed to General, 1st Baron, Henry Maitland Wilson. With Blamey’s promotion to Deputy CIC, I Corps was left without a permanent commander. Blamey wasn’t sure that his tenure on the Deputy job was particularly strong and so he didn’t wish to fully relinquish the I Corps command. Wilson tended to command from 100 miles away from the front and Blamey felt that he wasn’t maintaining proper control of the situation from all the way back there. He had to do something to ensure better control closer to the front. So, he bit the bullet, and officially appointed General John Lavarack to I Corps command and Major General Tubby Allen to command 7th Division. In doing so he placed Lavarack between Wilson 100 miles back and Allen on the front line, and a successful conclusion to the Syrian campaign soon followed.
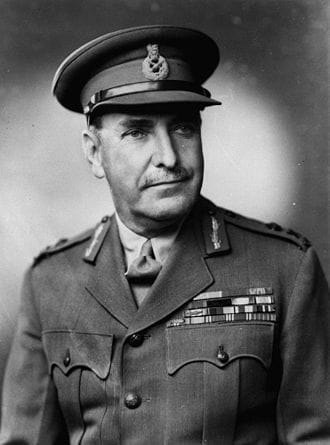
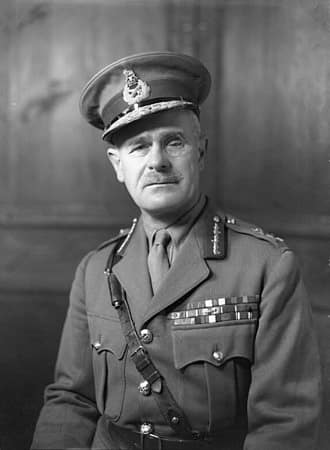
On 24 September 1941, Blamey was promoted to the rank of full General, being only the fourth Australian to achieve this rank alongside Chauvel, Monash and White.
It was also at this time which Blamey did one of the things for which he should be roundly praised. The 9th Division in Tobruk were beginning to wear out. They’d lived on a meagre diet, in flea infested dugouts, in the blistering heat, subject to air and artillery fire during the days and offensive patrolling at night for eight months. It was beginning to show. They were exhausted and in serious need of relief. The British High Command reckoned they should hang in there, but Blamey put his foot down and stood firm. He insisted that the 9th Division be relieved and given sufficient rest prior to being thrown back into the fray. He even did what few people in history had managed to do successfully – he defied Winston Churchill. Winnie was adamant that the 9th Div should stay in Tobruk to allow British units to be deployed elsewhere. Blamey more or less told him where he could shove it. Bravo, that man.
So for standing up for the interests of Australian troops, that’s a big tick on the positive side of the ledger. Later, when commenting on Blamey’s time in the Middle East, Wavell said of him “Probably the best soldier we had in the Middle East. Not an easy man to deal with but a very satisfactory man to deal with.” On the other side of the coin was General Auchinleck who said he found Blamey likeable, but he “wasn’t a general I should have chosen to command an operation.”
So even in the British High Command, Blamey divided opinion.
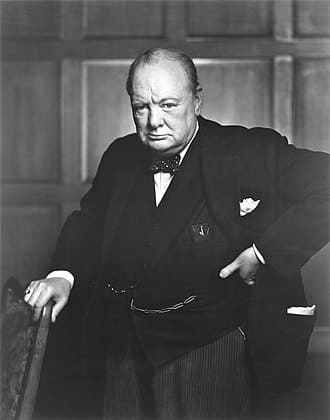
Winnie Churchill didn’t take his rebuff from Blamey lying down. He raised the possibility of asking the Australian government to recall Blamey to Australia, no doubt hoping a more compliant man would fill his place. As it turned out, events conspired to make that request unnecessary and provided another poke in the eye for Churchill.
The Japanese kicked off their war in the Pacific in December 1941 and suddenly, at least to Australian eyes, there were much higher priorities than North Africa. Australia itself was threatened. PM John Curtin requested the release of the AIF from Africa to come to the defence of their homeland. Churchill refused. Curtin said, “we’re doing it anyway”, but a compromise was reached. The 9th Division would stay behind. This was basically because, after Tobruk the 9th was buggered and wouldn’t be of much use against the Japanese for quite a while. They could rest and recuperate in North Africa while appeasing British demands for Australian involvement in that area.
So, Blamey returned to Australia to take on the role of Commander in Chief of the Australian Military Forces. He faced a situation no other Australian commander had ever faced, the very real threat of invasion of the Australian mainland. With the AIF still in the Mediterranean the only forces available to him initially were militia units. These units were only partly trained and, as all the best equipment had been sent with the AIF overseas, the militia only had access to outdated equipment.
While he was attempting to sort all that out, the American General, Douglas MacArthur, fresh from his arse-kicking in the Philippines, arrived in Australia and, as usual the Australian government handed over supreme control of the war effort to a foreign general. With MacArthur as Supreme Commander South-West Pacific, Blamey was appointed commander of the Allied Land Forces, basically MacArthur’s deputy.
Blamey set up his headquarters in Melbourne and MacArthur set up his HQ in Brisbane. For anyone outside of Australia, that means that the two headquarters were 1 700 kilometres away from each other. Just to make things more ridiculous, there were very few Americans at Blamey’s HQ and even fewer Australians in MacArthur’s. This arrangement was never going to work.
Blamey reorganised the defence structure of Australia, creating First and Second Army, under Generals Mackay and Bennett respectively and a Corps in Western Australia. General Rowell was given command of 1 Corps which he was to take to New Guinea immediately.
The Battle of the Coral Sea in May 1942 spelt the end of any real threat of a seaborne invasion of Port Moresby, but code breakers had intercepted messages which showed the Japanese intended an overland attempt via the Kokoda Track. The 7th Division was eventually sent to Port Moresby to bolster the militia forces already in the area. Soon the 7th Div was fighting off the Japanese landing at Milne Bay, the first successful repulsion of a Japanese amphibious assault. Meanwhile the Militia were soon going at it hammer and tongs with the Japanese at the village of Kokoda.
Outnumbered, poorly equipped and with excessively long supply lines, the men of the 39th Militia Battalion put up a stubborn resistance against the battle hardened Japanese but were soon left with little choice to undertake a fighting withdrawal. The spirit and tenacity displayed by the 39th at Kokoda and Isurava should have earned them commendation from the highest-ranking Australian officer, but it was not to be.
With a complete lack of understanding of the terrain and numbers of the enemy, MacArthur decided that the Australians weren’t putting up enough of a fight. Frighteningly, one of the things he used to reach this conclusion was the Australian’s casualty list. Basically, not enough were being killed. In essence, MacArthur felt that if you weren’t losing thousands of lives, you just weren’t trying hard enough. It couldn’t be that the troops on the ground could see that a particular position was about to be overrun and used military common sense to pull back, reset and face the enemy again. Unreal.
So, disturbed by the Australian’s apparent lack of fighting spirit, MacArthur told Curtin to send Blamey to New Guinea to sort it out. This served two purposes for MacArthur – hopefully it would reinvigorate the Australian’s martial spirit and it got Blamey out of his way and left him free to do what he wanted without any real interference.
Although Blamey stood up to Churchill, he couldn’t stand up to MacArthur and his own Prime Minister and so off to New Guinea he went arriving on 23 September 1942. He met with Rowell and although it’s not clear exactly what was said, chances are it wasn’t a love-in. Rowell was apparently ‘petulant and uncooperative’. Hardly surprising though, when you consider his boss had just lobbed and accused him of not doing a particularly good job, even though that boss had not previously set foot in the country and had no idea of the conditions. Rowell was also one of the officers who had witnessed Blamey’s manoeuvring to get his son on that plane back in Greece. So ya know, no love lost there.

On 28 September, Blamey sacked Rowell. The first of many heads that would soon roll.
With the Japanese having been stopped within sight of Port Moresby, the Australians began to push them back over the Kokoda Track, but not fast enough for MacArthur’s liking. Blamey obviously felt he was fighting for his own career now and so to keep the American happy, he sacked Brigadier Potts of the 21st Brigade and then Major Allen of the 7th Division.
In November, Blamey’s most notorious incident occurred. With the 21st Brigade, which had taken on the brunt on the Japanese invasion and conducted a text book fighting withdrawal and eventually defeated the Japanese, called up on parade, Blamey addressed them. Thinking they were about to receive their commander’s gratitude for a tough job well done, they were instead berated by Blamey. Although no official record of his rant was kept, there were plenty of Diggers who remembered the words, “The rabbit who runs is the one who gets shot.” He was basically telling them they were cowards. Murmurs ran through the assembled troops and there was anger building but, disciplined troops that they were, none fell out of the ranks. Blamey’s staff later claimed that the troops had misinterpreted his meaning, but in my humble opinion, it’s unlikely that a few hundred men would all reach the same misinterpretation.
The sackings of the commanders and his rant at the 21st Brigade sowed a lot of contempt for Blamey among the troops and to this day it is probably one of the incidents which most people hold against him. It certainly calls into question his understanding of how to command men. You could hardly imagine Monash upbraiding his troops in that fashion, or for that matter, having no appreciation of the ground and conditions in which those troops had been fighting.
Notwithstanding all that, the war continued. The Japanese had been forced back to the north coast of Papua where heavy fighting developed around Gona, Buna and Sanananda. This phase of the war actually gave Blamey a bit of an upper hand in his personal battle of egos against MacArthur. The Australians took on the tougher fight at Gona and Sanananda while the Americans were given the slightly easier, in theory, task of taking Buna. Despite suffering heavy casualties, the Australians achieved their goal while the Americans struggled. It was only with Australian assistance that Buna fell.
Blamey was able to say to MacArthur that he would prefer Australian troops over American because he knew that at least the Australians would fight. Given the recent events, MacArthur couldn’t really argue. But he did ensure that American troops would never be under Australian command again by reorganising the Pacific Task Force and using American troops to push to the Philippines and the island-hopping campaign, while keeping the Australians in Papua. There’s nothing quite like an American General’s tantrum hey.
So, the general situation for 1943 looked something like this. The Japanese had been pushed back across Papua New Guinea and the south-eastern toe of the island was pretty much under control. But the Japanese still held strong positions on the Huon Peninsula, New Britain and Bougainville. This gave them observation of the sea lanes required for MacArthur to realise his goals of returning to the Philippines. Any major naval force travelling that route would be subject to air attack from these positions.
This basically set up the strategic plan for 1943. The Japanese had to be cleared and, as Task Force Commander, it was up to Blamey to see it happen as MacArthur still had his hands full in the Solomon Islands.
Blamey devised a series of battles to reclaim territory from the Japanese bit by bit which he launched in mid 1943. The first target was Salamaua which sat on the southern end of the bay forming the southern side of the Huon Peninsula. From May to August the 3rd Division and then the 5th Division pushed forward towards Salamaua which eventually fell on 11th September.
On 4th September, just a bit further up the coast, the 9th Division, fresh from its epic involvement at the Battle of El Alamein had been returned to Australia, reinforced and now joined the Pacific campaign with an attack on Lae. Although their landing was unopposed from the ground, the Japanese did attack from the air, causing numerous casualties. They advanced as far as Busu River, which they were unable to cross due to the lack of equipment and the Japanese soldiers on the other side.
The 7th Division was flown into Nadzab after the US 503rd Parachute Infantry Regiment and two guns from the Australian 2/4th Field regiment dropped in and seized the airfield. After some hard fighting, and a tragic accident which saw a US Liberator bomber crash on take-off and smash into five trucks carrying the 2/33rd Battalion killing 60 and injuring 90, the 7th Division fought on towards Lae and captured the town on 15th September, just beating the 9th Division to the prize.
The fighting then moved to the Huon Peninsula. The 9th Division captured Finschhafen in September and then Sattleberg in November. The battles of Lae and Huon Peninsula will have articles of their own so I haven’t gone into detail here. Just be assured that behind the scenes organising all of this was Blamey.
But when 1944 rolled around the strategic situation had changed and the Americans took over much of the land based operations under MacArthur’s direct command. It was becoming clear that Australian troops would be pushed into a minor role while the Americans pushed on through the Philippines and beyond.
With nothing better to do, Blamey joined Prime Minister Curtin on a tour of the US where he met the Joint Chiefs of Staff who wanted to hear from the horse’s mouth, so to speak, about how things were going in the Pacific. No doubt Blamey talked up his own involvement, but it must be said he did deserve a lot of the credit for the organisation of the operations throughout 1943.
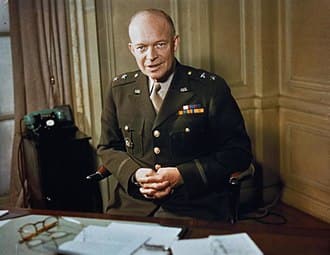
From America, Curtin and Blamey jumped over the pond and visited London. Blamey busied himself talking with Eisenhower and Montgomery and was given an overview of the upcoming D Day operations. I wonder what he must’ve thought seeing the scale of the operations compared with the comparatively small operations he’d planned. Did he have any advice for Eisenhower? Was he envious that he wasn’t taking part in what would obviously be the biggest operation in the history of warfare. We’ll never know, but it’s interesting to ponder.
While in England Blamey also spoke with some British commanders about the possibility of a joint British/Australian operation, pushing north from Darwin and into the Dutch East Indies, now known as Indonesia. It was a viable proposal which would potentially clear shipping lanes and open the way to Singapore and Malaya. But it never eventuated because MacArthur didn’t back it. And neither did Curtin, which rubbed Blamey up the wrong way. It seemed that the Australian Prime Minister was always siding with the American General rather than his own Chief of Staff.
There was also tension between the two over the way Blamey ran the army. Blamey was thought to hold too tight a grip on all aspects, allowing nothing to be done by subordinates if he didn’t have to, even if that was their job. He maintained that kind of control was necessary to avoid Australian interests being crushed by American interest. His ego also convinced him that he was the only Australian commander capable of doing so.
By early 1945, the Japanese were being pushed back across the islands leading to Japan. All that fighting was being conducted by Americans, while Australian troops were left behind in New Guinea to mop up whatever enemy resistance remained.
Blamey and Curtin were back in Australia and Blamey set to work planning the campaign in Borneo with the I Corps. MacArthur had decided that I Corps would report directly to him, bypassing Blamey’s control over his own troops. Quite rightly Blamey objected and as a concession, barely, he was able to place a liaison officer in MacArthur’s headquarters.
Blamey voiced his doubts over the need for the Borneo operation. After all, the Americans were closing in on Japan. Attacking Borneo wasn’t going to affect that battle in any way. But MacArthur advised Curtin that the US Joint Chiefs had ordered the attack. What he failed to mention was that the Joint Chiefs only ordered it after MacArthur himself had told them the Australian Government felt it was important. In any event, the campaign went ahead and a further 229 Australian lives were lost before Japan surrendered a matter of weeks later.
It’s kind of astounding that Blamey, the man who had successfully stood up to Winston Churchill and the British High Command in relation to the removal of Australian troops from North Africa, couldn’t seem to dig his heels in against one American general when it came to preventing the loss of Australian lives on an irrelevant operation. You have to ask why. Was it simply because he didn’t have the backing of the PM like he did in North Africa? Or was he wanting to preserve his reputation as a commander. If he was to lose his job so close to the end of the war, he’d have no chance to redeem himself.
Either way, the war finished with a victory for the Allies and when MacArthur took the formal surrender of the Japanese on the deck of the USS Missouri in Tokyo Bay, Blamey was there. He’d also taken the surrender of the Japanese commander in Papua, with a lot less diplomacy than would be expected from someone in his position. An Australian nurse, Sister Una Keast, or Mills as she was at the time, said that during the ceremony Blamey was enraged, with his face burning bright red. She felt he was about to have a stroke. Fortunately, he managed to conduct himself better on board the Missouri.
Sometimes, when wars end and governments no longer need their top soldiers to win the war for them, the governments will cut those soldiers adrift. This happened to Blamey. Tolerated by the Government while there was a war to fight, on 14th November 1945 Blamey was dismissed from his role as Commander in Chief and on 31st January 1946 he was formally discharged from the army, after 39 years.
Maybe as some kind of attempted consolation he was offered honours for himself, which he declined but did request honours for some of his generals, eventually securing knighthoods for Northcott, Savige, Sturdee, Berryman, Burston, Steele, Stevens and Wootten. A nice gesture it must be said.
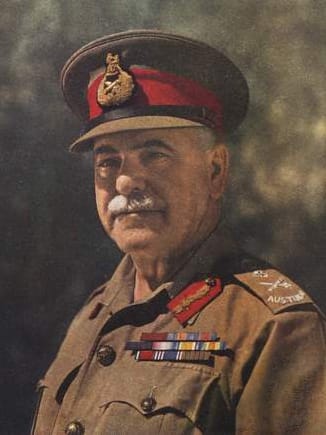
After the war he devoted himself to some business interests and writing his memoirs. In 1950 the then Prime Minister, Bob Menzies promoted Blamey to the rank of Field Marshall. Blamey was in hospital at the time and the Field Marshall Baton was presented to him in a bedside ceremony on 16th September 1950 by the Governor General. On 27th May 1951 Blamey suffered a stroke while in the Heidleberg Repatriation Hospital and died. A state funeral was held, and it is estimated that a crowd of 250 000 gathered.
And so that’s the life of Thomas Blamey, veteran of World War One and Two and the only Australian soldier to be promoted to the rank of Field Marshall. I said at the beginning of this story that I’m no fan, so it’s worth revisiting that comment now that I’ve delved deeper into his life.
First of all, there can be no doubt about his personal courage, nor his capacity for hard work. As far as his technical abilities as a commander, I’d say there was probably no one better suited to the job of Commander in Chief during World War Two. His apprenticeship, of sorts, under Monash no doubt went a long way to creating a competent commander with a good grasp of grand strategy. He was also, up to a point, able to stand up to his superiors. He may have been difficult to like, as many of his contemporaries would point out, but as Curtin said when he appointed Blamey he was “seeking a military leader not a Sunday School teacher” and that’s fair enough.
So from a soldier point of view, all good.
But from a person point of view, well, as I think I said, in my opinion integrity is probably the most important trait a person can have. And on that front, you’d have to think Blamey comes up short. Personally, I don’t care that he liked a drink and the company of prostitutes. That’s quite common among the soldiery”¦”¦not me of course, pure as the driven snow I was. But the failure to take responsibility when he was caught out as police commissioner and the fact that he made Savige compromise his own integrity definitely rubs me up the wrong way. Then the incident in Greece with securing the last seat for his son, yeah not great. But the worse black mark against him was his actions in New Guinea, sacking competent officers who had fought well under near impossible conditions and then berating the 21st Brigade while having no understanding of what they had actually achieved. There’s no forgiving that.
For me, I admire him as a soldier, think he was probably ok as a Senior Commander, but as a person I really have no time for him and don’t believe he was worthy of elevation to Field Marshall, an honour denied better leaders. But it’s not my intention, or my place, to tell you what you should think of him. So, this is his story, make of it what you will.
Related story: Field Marshal Sir Thomas Albert Blamey – Part 1
Other military items by the author, Warwick O’Neill, can be found at: https://www.australianmilitaryhistorypodcast.com/
You can read more about the author, Warwick O’Neill, here.
