
Warwick O’Neill
Last time we looked at the Battle of Menin Road. Despite being a success, it was only one part of the overall Third Battle of Ypres. The 1st and 2nd Australian Divisions, along with British and South African troops had pushed the line forward, with the Australians now on the edge of Polygon Wood. It was now the turn of the 4th and 5th Divisions to take over and continue the momentum. Would they be as successful as the 1st and 2nd Divisions? Only time would tell.
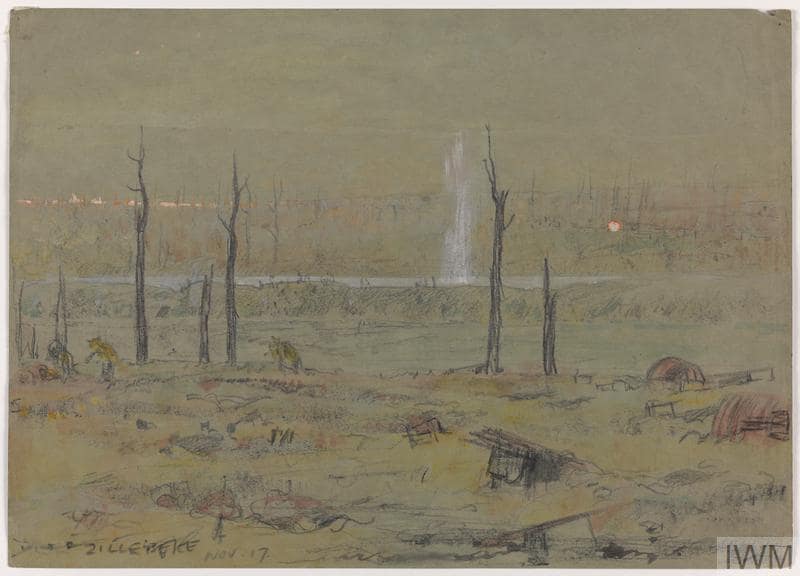
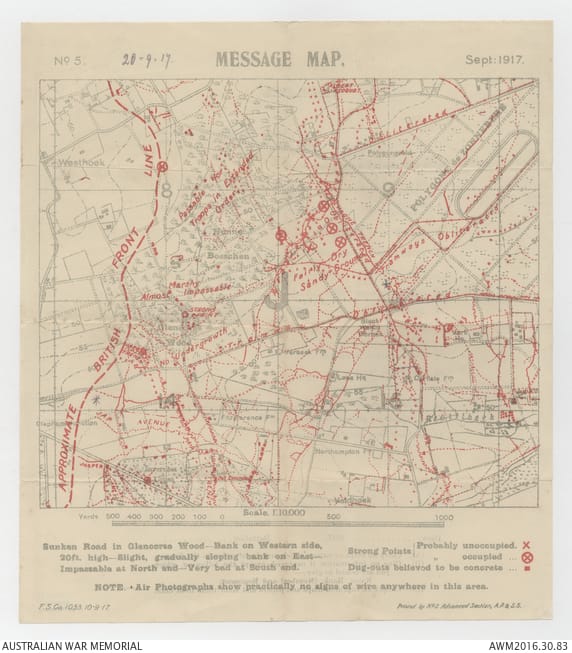
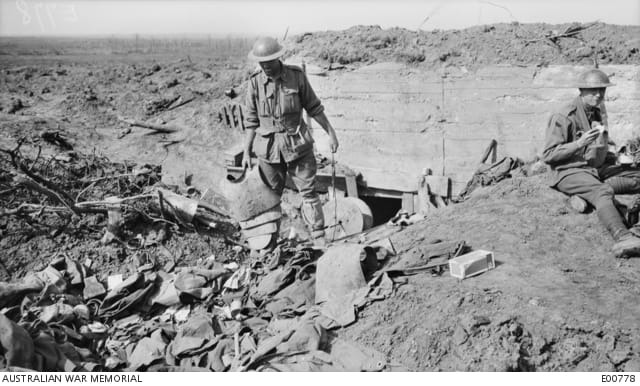
Before we get too far into this battle, let me take this opportunity to advise you to banish all images of trees and lush undergrowth when you think of Polygon Wood. This may have been true in early 1914. But remember this is part of the Third Battle of Ypres. This area had been fought over on two previous occasions. Not to mention the constant small-scale fighting over the last three years. As far as wood goes, there were a few splintered stumps here and there and that’s about it. The rest of the landscape was your typical Great War battlefield – barbed wire, broken equipment, the remains of dead men scattered everywhere and a lunar landscape of shell holes and dust.
And of course, German machine guns and strong points.
Having successfully reached the planned extent of the Menin Road battle, the second step could now begin. As always, the prelude to any attack was an artillery bombardment on the enemy positions. The trouble at this point though, was the artillery was still more or less in the position it was in to support the Menin Road battle. In order to support the attack on Polygon Wood the entire artillery compliment needed to be bought forward.
Too easy you say. Well, no. The ground they had to move over was the battlefield that the Allied and German artillery had just been blasting the beejesus out of. Roads, rails, tracks and even any nice flat bit of ground had all been obliterated and it was now a mass of craters and debris. So in order to bring the guns forward, new infrastructure needed to be built. Light rail was the go-to option for delivering large amounts of supplies as far forward as possible. Tracks could be laid quickly and didn’t require too much preparation of the ground beforehand. However, weaving a rail line through the shell holes wasn’t always practicable. Roads could more easily negotiate the rough ground but they were labour intensive to construct and road transport wasn’t as efficient as rail.
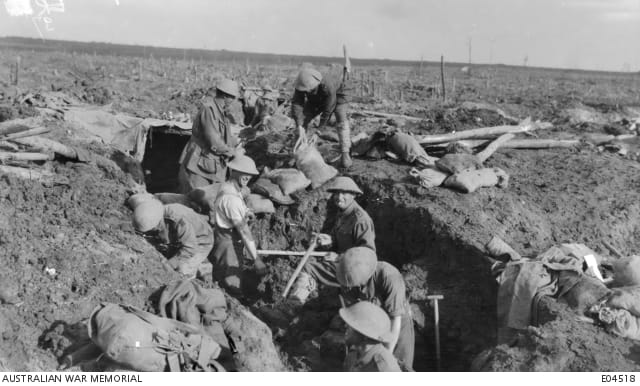
Of course, the Generals had realised this was going to be a requirement and so had everything in place, ready to go as soon as the front line had stabilised. On 7th September the Pioneers of all five Australian Divisions went to work on the Anzac sector, while their British counterparts covered their Divisions. These lads don’t always get the mention they deserve, so I won’t buck that trend here.
Just kidding. When you think of battles you immediately think of soldiers with rifles and machine guns, charging forward and fighting each other for a piece of ground and then holding it. What you don’t normally consider is the blokes who have to undertake the plethora of jobs required to get the troops there and to keep them there. Roads and bridges need to be built and repaired, storage areas need to be constructed for keeping ammunition dry and protected, and when an enemy trench is captured, someone has to connect that trench to the trench the attack was launched from. The pioneers did all these tasks, quite often under fire while they themselves carried not much more than a shovel. Without such men, the great armies of history would go nowhere.
The light rail extended along the wide gauge line from Ypres to just behind the lines, where two planks roads were constructed, one behind the old Allied front line and another between that line and the new front line. It took about two weeks, which is no mean feat when you consider the state of the ground when they started.
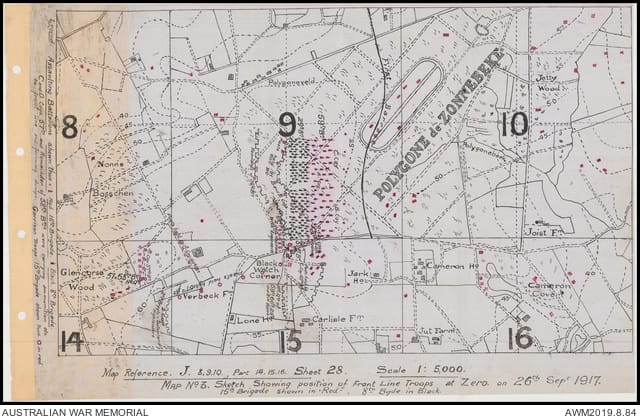
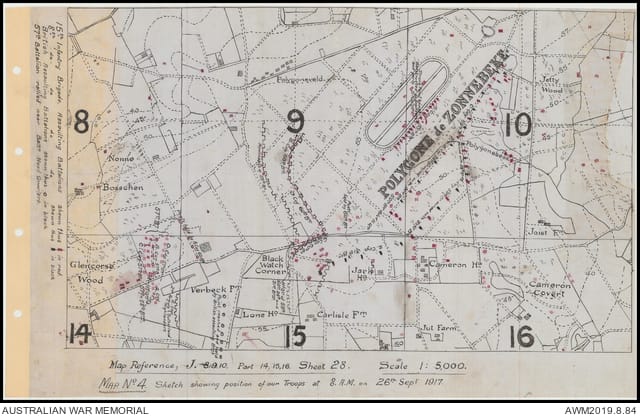
And so, by 26th September, the Third Battle of Ypres was ready for round two. The Anzac part of this step was to be the capture of Polygon Wood. To their north the British would push towards Zonnebeke while to the south other British Divisions would push toward the Ghulevelt Plateau.
Over the nights of the 22nd and 23rd September, the 1st and 2nd Australian Divisions were replaced by the 4th and 5th Divisions giving the new arrivals a couple of days to look over their objectives. The general plan was the same as Menin Road, each Division would attack with two Brigades and each Brigade would throw one Battalion at the first objective and two Battalions at the second. The main ridge was believed to be the hardest point of the attack and was given to the 5th Division as they’d had a month’s rest by this stage. The 4th had only been taken out of the front line at Messines a couple of weeks earlier and their attack was to be directed towards Tokio Spur.
Major General Sinclair-MacLagan of the 4th decided to use the 4th and 13th Brigades while General Hobbs of the 5th would send the 14th Brigade under Brigadier General Hobkirk and the 15th under Brigadier General Elliott, known throughout the AIF as Pompey Elliott. I’ll be doing an article on Pompey in the future as he was one of the most popular commanders within the AIF and bit of a character. He never really fitted the mould of what a senior officer should be. He always looked like he’d slept in his uniform and he wouldn’t simply go along with a plan because a superior officer told him to. He commanded the 15th Brigade at the disaster of Fromelles. He tried to have the battle postponed, pointing out that it was going to be a massacre. In the end he was unable to convince his superiors and was subsequently proven right. At least his troops knew he cared for their welfare, which is why he was so popular with the and also why he wasn’t so popular with the Top Brass.
On the 25th a slight scare occurred. A German bombardment fell on the British positions to the South. This was not particularly unusual and the senior commanders didn’t think much of it. But Elliott and Hobkirk were a bit more concerned, particularly Elliott as his right flank joined the British. At 8:46am a pigeon arrived at British 33rd Division HQ advising that a German attack had succeeded in capturing a part of the line at Menin Road.
The news eventually filtered down to Elliott. He now had a problem. The ground which the Germans had seized was his jumping off point for the attack. In 12 hour’s time the tapes marking the line were supposed to be laid. Troop movements and artillery arrangements had been worked out on the basis that the attack would launch from there. The ground had to be recovered, but the only troops he could send were from the Battalions assigned for the fighting the next day. But quick to realise he had few other options he ordered a company of the 60th Battalion to retake the ground. At 10:40 he got word that his British counterpart, whose Brigade had lost the ground, was sending two companies of the Argyll and Sutherland Highlanders to assist the Middlesex in counter attacking the Germans. Elliott verbally ordered the commander the 60th, Norman Marshall, to send a second company to assist.
Communications with the both the British and Anzac companies during the counter attack became difficult. Reports were received that the Brits had retaken the ground, but other reports stated that they hadn’t. But it was soon confirmed that the Germans were still very much in possession and were pushing hard at Verbeek Farm, 750 yards from where Elliot’s flank met the British. Discussions were underway to decide whether the Australian right should be withdrawn.
That’s how the events appeared at Command level anyway.
At the business end, it was a bit different.
After the Battle of Menin Road, the Germans obviously weren’t just sitting around thinking ‘thank god that’s over.’ The overall commander in the sector, Crown Prince Ruprecht, knew that another attack would follow. He also knew that he wouldn’t have sufficient reserves behind the front line to hold such an attack. He needed to buy some time. What better way than to launch a heavy counter attack, not so much with the purpose of seizing ground, but to convince the British that they should wait a while before embarking on the next attack, thereby giving the Crown Prince time to bring in the extra troops he needed.
Such an attack required meticulous planning and preparation, neither of which the Germans had the time to do. The opening was less than auspicious. The artillery bombardment which opened the attack was awe inspiring, one of the largest bombardments put in to support a single division operation. Only problem was, it was falling mainly on the German infantry waiting to go forward. A flurry of red flares was seen to go skyward, telling the artillery to lift its range, but in the confusion many of the infantry fell back to safer accommodations. So when the time to advance arrived, the infantry were quite a way in arrears of their protective bombardment.
The Australian 58th Battalion were the first to see three columns of Germans snaking their way forward about 500 yards to their front. The right hand company commander, Lieutenant Boyd, fired an SOS flare and led his support platoons from Black Watch Corner and set up a defensive position to cover the ground between his company and the 1st Middlesex Regiment position. Fifteen seconds after firing the SOS flare the artillery began falling on the Germans. Combined with the Boyd’s Lewis guns and rifles, the intensity of the fire held the German advance.
At 6:10 a messenger from the Middlesex arrived and advised Boyd that the Germans were in the Middlesex front line position. Boyd requested, and received a further two platoons and was confident that he could now hold the ground while the Middlesex prepared their counter attack.
There was a brief lull at about 9 o’clock and the Australian artillery took the opportunity to take a couple of practice shots to make sure that when they were once again called upon, they would put their shells exactly where they were needed. Then at 10 o’clock columns of German infantry were seen making their way down the 58th Battalion right flank towards the Middlesex support lines. The 58th’s Stokes mortars were running low on ammunition, but by far the most critical problem was that the Australians were being fired on from behind by Germans who had penetrated the Middlesex line and had established machine gun positions behind the Australian front line. Disconcerting to say the least. Bean described this as the second and final crisis of the day.
While dealing with this issue, word arrived that the Middlesex counter-attack was timed for 2pm and would be supported by the 60th Australian Battalion. Boyd and the rest of the 58th would just have to hold on long enough for the counter attack to ease the pressure. The fighting ebbed and flowed for most of the rest of the day, but in reality the German advance had been stalled by 11am, not that the Allies were aware of this. The German artillery was still pounding the area and the to-and-fro of the fighting still left Boyd’s company dangerously exposed. By late afternoon, unaware that the Germans were just about spent, he ordered a withdrawal back to more secure positions. But the crisis was over and soon, with a few alterations, the Battle of Polygon Wood could go ahead the following day.
The reason I’ve presented the Headquarters account and the front line account of this incident was not to push the standard ‘incompetent Generals of World War 1’ theme. It is to show the principal problem all senior commanders faced during that war. Communications technology had not kept up with all the other technologies of war. While the technology of killing – machine guns, heavy artillery, barbed wire, gas and aircraft had all been developed, the greatest advance in communication was the telephone, and this was pretty much useless in a dynamic situation such as you get during an attack. Lines needed to be laid and were often blown up not long afterwards. The principal form of communication was the runner or the humble pigeon. Both these were inefficient. Usually by the time the commanders received the message the situation at the front had changed.
This is why on many occasions the battle being fought by HQ is a completely different battle than that which is being fought at the pointy end. It’s common human practice to want to blame someone, and its usually those senior commanders who cop the worst of the blame. No doubt sometimes that blame is entirely justified. But commanders can only fight a war with the tools available to them. It’s hardly their fault that no one had developed radio communication at that stage in history.
The Battle of Polygon Wood opened with a terrific bombardment at 5:50am on 26 September. The barrage has been described as the most perfect barrage ever to protect Australian troops, “moving forward like a Gippsland bushfire.” The ground was dry and hard, meaning that soon the air was filled with smoke and dust, almost a solid wall. It was so thick that individual shell explosions couldn’t be distinguished. The only downside was that the advancing troops were unable to tell exactly where the line of barrage was until they walked into it. Officers and NCOs leading men forward had to keep direction by compass, as they were unable to see any landmarks.
On the upside, it was all falling perfectly on the German defenders and even those not directly under the shelling couldn’t see the Australian advance and so were unable to direct their own artillery or machine guns.
On the right flank, the flank which had been subjected to the German counter attack the previous day, Elliot’s 15th Brigade went forward as they were trained, with a small screening force leading and the main body following at distance behind. But two Battalions of the 8th Brigade, the 29th and 31st, which were to follow the 15th Brigade, had been trained differently and pushed forward in a rush to hug the barrage. This led to some confusion as Battalions became intermingled.
They soon came upon ground still held by the attackers of the previous day. The initial plan for the attack had assumed this area was free of Germans, which it was when the plan was developed. The intelligence officer of the 29th Battalion, Lieutenant Gullet, counted eighteen machine guns in the area. A quick bit of maths. The German Maxim Machine gun could fire at least 550 rounds per minute. Times that by 18 and you get about 9 900. So let’s round that up to 10 000 rounds per minute. In an area where the Allies didn’t plan on there being any enemy. Obviously, they weren’t firing continuously, but even if they only fire half that number, that’s still 5000 deadly bits of lead flying towards the Australians every minute. And that doesn’t even take into account the riflemen adding their weight of fire. It constantly astounds me that anyone survived advancing across no mans land. As Banjo Paterson once said, when he was the official correspondent during the Boer War, after witnessing an attack and the amount of fire required to bring enemy troops down, “it takes a lot of lead to kill a man.”
It was into this firestorm that the 15th Brigade advanced. As they came into view of the machine gunners the line rippled briefly before, acting on their own initiative, the Australians swung towards each post. More often than not, at this point the Germans would throw up their hands and plead for mercy. Sometimes they received it, other times not. But there were some German crews who refused to surrender or fall back and Gullet reported that one was still firing his gun as an Australian bayonet pierced his heart.
Two pillboxes in the south east of the wood caused considerable damage as did a particularly determined crew in the region known as the racecourse. And as the advance continued, they came under fire from German positions at the Butte to the north east and outside of the Brigades area. During this phase of the battle the 59th and 29th Battalions suffered heavy losses of officers and men, but they did eventually reach their objectives.
The left flank Battalions of the 15th Brigade moved onto their stated objectives in line with the 14th Brigade on their left. But on the right, the bulk of the 59th Battalion mistook the racecourse for their objective and pulled up 150 yards short of where they were supposed to finish.
To the right of the 59th, the 31st Battalion initially advanced along its correct line until it was thrown into confusion by receiving fire from behind them in the region that the British 33rd Brigade was supposed to have captured. The right company of the Battalion, under Captain Hibbs was obliged to turn and attack two pillboxes located at Jerk House, which had been untouched by the barrage. Fire from the pillboxes drove Hibbs to ground, seeking shelter in shell holes 100 yards from Jerk House.
Lieutenant Brodie jumped up waving his stick and shouted ‘We must charge it,’ and was promptly shot through the head. Not to be outdone Lieutenant Rose thought he’d give it a go and was also immediately shot. I don’t mean to make light of the death of these men, but it does demonstrate that the old romantic notion of brave officers waving their swagger sticks, encouraging their men was still alive and well, even three years into this war.
How many men were killed in the Great War, and other wars for that matter, because their leaders didn’t take five seconds to think of alternatives and just fell into the old ‘follow me lads’ mind set. I often ponder that question, but never having led troops in battle I can’t condemn those who have. It just seems a waste to me. Anyway, back to it.
Hibbs was also shot by a sniper. He had extended his line 200 yards into the 33rd Division’s front, stretching his own line painfully thin. Soon enough though they were reinforced a bit by the arrival of a few trench mortar troops.
Most of the follow up troops headed in the right direction, but some were drawn by the firing from Hibbs’ company. As they arrived they could tell immediately that their right flank was hanging in the air and totally unsupported. The position was totally exposed to fire from Jerk House where a large number of Germans were gathering for a counter attack. Lieutenant Hill tried directing the fire of what was left of the Hibbs’ company, even after having one eye shot out, but the enemy attacked and Hill, along with another officer and about 20 men, mostly wounded, were captured.
The main body of the 31st pushed forward and reached its first objective, but there came under intense fire from Cameron House. Major Tracy had little option but to swing back his flank to face the Germans in this area. Seeing this, neighbouring units thought a withdrawal had been ordered. It was only quick action from Colonel Mason that set things right and halted an unintended withdrawal.
Now there was a problem. The right flank was opened. Advancing with an open flank would be disastrous. A company from the 57th which had been tasked to protect the flank had taken the brunt of German artillery just as the initial advance began and they couldn’t get through. Colonel Toll of the 31st had to decide whether or not to commence his second stage at 7:30 with the knowledge he had no flank security. He wisely decided he couldn’t take that risk and would hold the first objective until the British managed to catch up.
Again, we see what happens in the confusion of battle when the unexpected happens. Some officer of the 29th also felt that moving forward on the second stage was dangerous and so they too ordered their men to stay put. This would’ve left the 14th Brigade’s flank open as they moved forward. Lieutenant Harper said bugger that, he wasn’t going to leave the 14th hanging and so he led his platoon forward.
Also some of the 31st Battalion’s platoons didn’t get the message about staying where they were and so they went forward with the barrage but noticed the 29th weren’t moving. Fortunately a runner soon arrived with the order from Toll and the advancing units of the 31st were bought back to the first objective.
But you can see from this, just how well-planned attacks can go pear shaped. What do they say, every fighter has a plan until he gets hit? The 29th and 31st got hit and we end up with a situation where some are going forward, some are going nowhere and then some who went forward are called back. It was probably only the timely arrival of that runner that prevented the second stage becoming a shambles.
Pompey Elliott ordered Toll to move his men on, but with them scattered about and mixed up with the 59th it was impossible to carry out the order. Pompey wasn’t happy and from that point on, he carried a very poor opinion of Toll, which wasn’t entirely fair it has to be said. Pompey was all the way back at Brigade HQ while Toll could see the situation at the coal face. It was probably the right decision not to advance with his flank exposed, but Brigadier trumps Colonel so Toll was never going to win that argument.
Not that there was time to make the argument any way. A message was soon received from the British 33rd Brigade that although the German barrage had split the 98th Brigades attack battalions, the 4th Suffolk and 1/5th Scottish Rifles as they assembled for the advance, they had now worked their way to a position from which they could advance with the Australians towards the second objective. The 98th was sending its third battalion, the Royal Welsh Fusiliers around the Australian rear to join the Suffolks and the Scots and would be ready to advance at noon.
Then things got confusing again. The noon attack didn’t actually happen, because by that stage the 29th Battalion’s second objective was pretty much already in Australian hands. How did that happen you may well ask.
Well, remember those blokes from the 59th who had mistaken the racecourse as their first line objective? Captain Neale of the 59th had been sent forward on a special duty and noticed these blokes digging in and he realised they were in the wrong spot. So, he decided to lead them forward to where they were supposed to be. They crossed a small stream known as the Polygonebeek which ran through their objective. They were fired upon as they crossed the Polygonebeek but as they continued to advance the Germans fell back to a couple of pillboxes situated on the 29th’s second stage objective.
Neale’s advance just happened to be going forward at roughly the same time that the 14th Brigade were conducting their advance to the second objective. A couple of German pillboxes on the 14ths flank was supposed to be attacked by the 29th during the second stage, but remember, they were still sitting pretty at the first objective waiting for the noon attack. A group of German’s attacked the 14th Brigade’s flank from these pillboxes.
The attack pushed forward but when the German commander was wounded, they fell back towards the safety of the pillboxes. It was about this time that Neale’s men arrived on the scene. Lieutenant Pentreath had just arrived at what was the first objective but noticed the fire from these pillboxes. Rather than sit and wait at the first objective he pushed straight at the strongpoints. He managed to capture the wounded officer and about 60 men. It was then discovered that they had pretty much secured the 29th Battalion’s second objective.
The 29th moved up and soon the position was secured. It was an excellent position offering full view of the Polygonebeek Valley and the Battalion settled in for a short stay.
Meanwhile the Royal Welsh had arrived at Black Watch Corner and soon began their advance towards Jerk House and Cameron House, but their Commander was killed almost at once by a shell. The scattered elements of the 31st recommenced their advance with Captain McLellan tying in with the British left flank and Lieutenant Coutts and Gamble coming in behind the Welsh as their second wave. There was practically no protective barrage and the Germans opened a ferocious fire on the British and Australians.
As a German officer noted in his diary, quote “when at about 11am the wall of mist on the right flank of the regiment had disappeared, the men of the 230th saw the deploying enemy, behind his rolling barrage, advancing deep on its flank and manifestly in the act of pushing to the south east. Enemy columns following after were now trying to reach Polygon Wood. On this incredibly favourable target there now fell at 1000 to 1800 metres the fire of all the heavy machine guns of the regiment that were still available, with annihilating effect, the British artillery being unable to fully suppress them. Seven heavy machine guns of the 1st Company sent streaming out in a short time more than 20 000 rounds.”
Despite this intense fire, the Welsh did manage to reach Jerk House but they were halted before being able to take Cameron House. Both Lieutenant Coutts and Gamble of the 31st were killed during their part in the advance. The 31st attempted to surround Cameron House but were unable to. At about 1.40 pm McLellan advised Colonel Toll that ammunition was running low, which was a problem beginning to be felt across the entire front. Then at about 4pm a large body of Germans was seen massing to the front of the line held by the Welsh and the 31st and, having not received any resupply of ammunition, the Welsh Commander informed McLellan that he would have to fall back.
McLellan agreed and suggested he should fall back to Jerk House while the 31st provided cover, after which the 31st would also fall back. During the move back the Welsh fell back on the men of the 59th and 60th Battalions. Seeing the British falling back for no apparent reason, the Australians rallied them and together they turned and faced the German counter-attack.
German aircraft were supporting their infantry and began strafing runs along the front held by the 59th and 60th as well as McLellan who by this stage was back on their first objective. The Allied infantry concentrated their rifle and machine guns on the aircraft and managed to bring down a couple of the most aggressive pilots. With the planes taken care of, the fire was then directed at the advancing German troops, just as the British barrage began to fall almost directly on the German line. The counter-attack broke.
That was basically the end of the fighting on day one on the right flank of the Allied attack. By dusk, some second objectives had been taken on the left of the 15th Brigade’s line, while on the right it had been a day of advance, falling back, reorganising and going forward again, only to fall short of the second objective, being Cameron House. Units were somewhat scattered and intermingled, but in the overall scheme of things, good progress had been made. And during the night, Cameron House fell into Australian hands.
When Elliott had learned at about dusk that the 33rd Division had been ordered to capture the second objective, he had ordered Colonel Marshall to co-operate with the attack. He moved elements of the 60th Battalion to join the 31st but the British attack failed to materialise. Elliott ordered Marshall to lead the Australian attack anyway as he didn’t want to just spend the night sitting around waiting for the next day. So Marshall went forward himself to have a look at the situation while the 60th got into position.
When Marshall arrived he figured he might as well lead some of the young officers on a raid against some blockhouses. During this impromptu raid, he inadvertently captured the Cameron House position along with a few prisoners. With that obstacle removed and the bulk of the 60th Battalion now ready for some work, he led them forward of Cameron House and dug in on Cameron Spur.
Early the following morning Pompey Elliott decided to see the situation at the front for himself. It was this kind of willingness to get to the pointy end which earned him the respect of his troops. Having satisfied himself that the job was nearly done for his Brigade he ordered the 31st Battalion to push forward and come into line with the 60th. This was achieved, however heavy fire inflicted casualties. The final part of the dance was completed when the Welsh advanced down Reutlebeek Valley and finally seized their objectives with only scattered German machine gun and artillery fire.
There was heavy German artillery fire scattered across the field during the day, but it had little effect as most of it fell on empty ground and the British and Australians were well dug in. Elliott’s 15th Brigade was relieved during the night of 28th, except those of the 60th Battalion who were relieved from their position at Cameron Spur on the 30th.
Bean attributed the success on this flank to Elliott’s leadership, stating, quote ‘he snatched complete success from an almost desperate situation ”¦ the driving force of this stout-hearted leader in his inferno at Hooge ”¦ was in a large measure responsible for this victory’.
Pompey himself was much more humble about the outcome. In a letter to his wife Katie after the battle he said, ‘’It is all due to the boys and the officers like Norman Marshall ”¦ It is wonderful the loyalty and bravery that is shown, their absolute confidence in me is touching—I can order them to take on the most hopeless looking jobs and they throw their hearts and souls not to speak of their lives and bodies into the job without thought. You must pray more than ever that I shall be worthy of this trust, Katie, and have wisdom and courage given me worthy of my job’.
Now, that takes care of the right flank in the 15th Brigade’s part of the attack and has only taken five and a half thousand words to tell. Strap in as we now move our focus to the centre and left flanks in the 14th Brigade’s sector. Don’t worry, this bit won’t take as long. The right flank was certainly the toughest part of the fight. But the centre and the left still had a tough job of their own on the 26th.
I decided to tell the story in two sections for two main reasons. One, that’s how Bean tells it in the Official History, and I’m too lazy to go back and forth to fit it into one chronologically correct narrative. And secondly, I reckon that if I was bouncing around between the 15th Brigade and the 14th Brigade it would just get too confusing, which is also probably why Bean chose to tell it in this way. So as I’m telling you about the 14th, just keep in mind that everything I’ve already told you is going on to the south at the same time.
The centre was occupied by the 14th Brigade and to the north of them on the left flank of the attack were troops of the 4th Australian Division. On the day before the attack, the 53rd Battalion moved into their position at Nonne Bosschen, where it was subjected to heavy German artillery fire. By the end of the day they had already lost 150 men from the force that was going to attack the following morning. Their ration party had been gassed and no rations made it to the front-line troops and so they tucked into their emergency rations. You would think this kind of day would have a terrible effect on the morale, but Bean reckons they were still pretty keen for the fight when they moved forward at midnight to find their jump off positions.
This area of Nonne Bosschen had been fought over before. In the early days of the war in November 1914, during the so-called race to the sea, German and British troops had met in this area and had fought the First Battle of Ypres. 10 000 Germans from two fresh divisions lined up against 4000 worn out British troops who had been fighting and moving for the last three months. The Germans had initial success in forcing the British back, but then the Poms counter attacked and forced the Germans to retreat back to the Nonne Bosschen woods. The British Brigadier General, FitzClarence planned a counter attack to force the Germans out of the woods, but he was killed before the attack commenced and it was never launched.
That was in November 1914. It’s now September 1917 and here they were, still fighting over this same patch of ground. Incredible.
Brigadier General Hobkirk of the 14th Brigade had ensured that all of his twelve waves were within 60 yards of the jump off point. When the German barrage fell it was well behind the assembled troops and caused no issues. When the Australian creeping barrage commenced, the 53rd moved forward and met little resistance. They were actually hampered in their progress by the standard rate of advance of a creeping barrage.
A number of pillboxes occupied the first 500 yards of ground, but they caused little problem and when the Australians surrounded each in turn, they were met by boys in men’s uniforms, crying and holding souvenirs out for the attackers. I can only imagine how confronting it would be to attack a position and to find that it is being manned by boys in their teens. I reckon that would take quite of bit of the fight out of a bloke. But a machine gun operated by a 15 year old will kill you just as dead as one operated by a 30 year old.
With the pillboxes taken, the troops came into view of the Butte, a prominent hill which overlooked the battlefield. It was the fire from this position which had caused the 15th Brigade some problems. But when the 53rd advanced towards the Butte, the machine gunners pulled up stumps and fell back. The Australians stormed over the position, throwing grenades down dugout entrances just in case anyone was waiting down there.
They then came under fire from machine guns to their left from the location of the old cemetery and the quickly turned their attention in that direction and seized the position along with 60 German troops, mainly medical men. The 53rd had reached the first objective. It was now time for the 55th and 56th Battalions to push on to the second objective. They were to take 1000 yards of the Flandern Line. This they achieved by 7:30 as there was very little left of the Flandern Line, just a few tangles of wire and the pillboxes were easily taken.
But then they came under fire from the right. Polygonebeek at this stage hadn’t been taken by the 29th and machine guns on that position caused the 55th and 56th some concern. A couple of unsuccessful attempts were made to silence the guns, with some casualties. A larger attack was planned, but before it could go in, the 29th arrived and the crisis was over. This was the last serious resistance encountered by the centre. The second objective was taken along with 200 hundred prisoners and 34 machine guns. The Germans launched a counter attack later in the day, but artillery observers had set themselves up on the Butte and saw the troops assembling long before the attack commenced. When it did come, accurate, directed artillery and machine gun fire broke up the attack before they got anywhere near the Australian position. The 14th Brigade consolidated and settled in with their job done by nightfall.
On the left flank, the 4th Division lads had an even easier run. The only downside to their attack route and final objective was that it was overlooked by Broodseinde Ridge. On the upside, once they’d taken their objectives, any counter attack would have to come over the ridge in full view of the Australians.
The attacking waves went forward with the protection of the creeping barrage. When the barrage reached a line of pillboxes, according to the plan, it would stop there and subject the pillboxes to a sustained bombardment before the troops moved in and picked up the pieces. Some of the infantry forgot that this was to happen and moved forward into the barrage, expecting it to lift. Captain Albert Jacka of the 14th Battalion soon had the situation sorted and pulled the over eager troops back. This is the same Albert Jacka who, as a sergeant, had earned Australia’s first Victoria Cross of the war at Gallipoli. Despite being there at the beginning of Australia’s war and being fully in the thick of most of the fighting involving Australians, he actually managed to survive the war. I will be doing an episode on Jacka, once I figure out how to do the bloke justice.
Anyway, the first objective was taken without serious incident and the men moved onto the second objective, another section of the Flandern Line. This was also taken with relative ease, but during the consolidation, German snipers and machine guns on Broodseinde Ridge caused some issues until the position was properly fixed up.
On the extreme left of the Australian advance, the 53rd Battalion occupied the brickyard at Zonnebeke. On their left, the British 3rd Division was supposed to tie in with the 53rd on the Windmill Cabaret Crest. But the mud which the British were to advance over was unexpectedly thick and they were unable to make it to their objective. But they managed to push far enough forward that they could cover the flank and so the 4th Division’s positions were secure enough when the German counter-attack came in.
An Australian pilot observed large numbers of Germans massing on the eastern side of Broodeinde Ridge at about 1:20pm. At 3 o’clock the first Germans appeared on the crest and Captain Jacka fired the SOS flare. Shortly afterwards the artillery responded and again the counter attack was broken up before it troubled the infantry. Another counter attack was launched against the 13th Brigade at about 4pm, but the Brigade managed to break that one up without the assistance of the artillery.
Out on the left the Germans launched their only successful counter attack from Windmill Cabaret Crest. They managed to force the British back a couple of hundred yards and the Australian flank was starting to look at bit exposed. But a message was received from a Scottish Officer stating “we’re at this position, and we’re staying here.” That was enough for the Australians to feel secure.
It was decided that there was no need to try and take Windmill Cabaret Crest at that stage. It could be taken care of during the next phase of the overall Third Battle if Ypres.
And that my friends is the Battle of Polygon Wood, the Australian part anyway. It wasn’t necessarily as easy as Menin Road, but that was mainly due to the stubborn defence on the right flank. The centre and left flanks had been as easy as Menin Road, but again we should never forget that in the Great War, even an easy victory shattered thousands of lives.

The 15th Brigade suffered 1203 casualties while the 14th lost 1 101. The total Australian casualties for this easy victory were a shade under five and a half thousand killed, wounded and missing. The British on either of Australia’s flanks suffered over 15 000, while the Germans lost about 13 500. And where did all these casualties get us? A few hundred meters forward and in position for round three, the Battle of Broodseinde Ridge, which we will cover in the next installment. I’ll catch you then.
Other military items by the author, Warwick O’Neill, can be found at: https://www.australianmilitaryhistorypodcast.com/
You can read more about the author, Warwick O’Neill, here.
