
Warwick O’Neill
The battles of Menin Road and Polygon Wood had advanced the Allied line a couple of thousand yards, give or take. By comparison to earlier operations throughout the war, the fighting had been almost easy. Coming on the back of the earlier battles of Messines and Pilckem Ridge, the twin blows of Menin Road and Polygon Wood had left the German’s battered and in some disorganisation. One more push and the Allies would take the final ridge before the ultimate target of this offensive would be laid out before them, Passchendaele.
But it was getting late in the season. If Passchendaele was going to be taken it would have to be before the rains came. But before they could take Passchendaele, they would have to take Broodseinde Ridge.
G’day everyone and welcome back to the third and final instalment of the three-part series covering the Australian role during the Third Battle of Ypres. If you’re tuning in for the first time, then can I suggest you go back and read the previous two articles to get a better idea of how we got to this point.
The previous Battles of Menin Road and Polygon Wood had involved troops from 1st Anzac Corps. Those troops were still in place and because of the comparatively light casualties suffered they were good to go again at Broodseinde Ridge. The big excitement of this battle was the fact that 2nd Anzac Corps was going to be joining in as well. Up to this point whenever an Anzac Corps went into a fight, they would have other troops on their flanks. This was going to be the first time where an Anzac Corps would have another Anzac Corps going into the fight alongside them. Four of the five Australian Divisions would fight side by side.
Now I realise that some of you don’t have a military background and so this talk of Corps and Divisions may be a bit confusing. You may have heard of the Australia Corps and so 1st and 2nd Anzac Corps doesn’t make a lot of sense. But at this point, at the end of 1917, Australian and New Zealand troops were not all in one Corps. In reality, the entirety of the Australian troops were not even in the same army. The Australia Corps would not come into existence until 1918. So now you’re totally confused hey.
I’ll break it down for you as quickly and simply as I can. First up, when Australia first went to war it raised one Division. This Division was 1st Division and it was the force which landed at Gallipoli. Then, due to the number of men signing up, a 2nd Division was created and they went to Gallipoli about halfway through. After Gallipoli, there was such an overabundance of troops, that it was decided to expand to five Divisions of Australians and one New Zealand Division. The experienced Battalions were divided up so each new Battalion would have a mix of experienced blokes and new fellas. All up there were 60 Battalions, making up five Divisions. These five Australian and the Kiwi divisions were split into two Corps. 1st Anzac consisted of 1st and 2nd Divisions and the New Zealand Division while 2nd Anzac consisted of 4th and 5th Divisions. No, I didn’t forget about the 3rd Division. They would be formed in England and would join 2nd Anzac in 1917. The Lighthorse is a completely different beast and for our purposes had no part in either Corps.
Now remember at this point Australians were just another part of the overall British army, to be dispersed as the British Commanders saw fit. So, 1st Anzac were assigned to the British Second Army while 2nd Anzac went to the British Fifth Army. And finally, just to confuse everything, when 2nd Anzac arrived in France, the New Zealand Division was transferred from 1st Anzac to 2nd and the 4th Division when to 1st Anzac. And that my friends, is military organisation in a nutshell.
So, what led to that diversion? Oh yeah, two corps fighting side by side. In general, during the war to this point an Australian division would go into the line and would subsequently be replaced by another Australian division, meaning they had never really had other Australians on their flanks. There had been a few occasions when the British or other forces on the flank hadn’t performed well, Bullecourt for example, which had led to difficulties. But now, not only was there an Australian Division on one flank, there was a whole Corps of their countrymen. It was a great comfort.
Adding to the sense of confidence going into the attack at Broodseinde Ridge was the comparative ease of the victories at Menin Road and Polygon Wood. The creeping barrages had been near perfect. The tactics of the attacks had worked out beautifully. It really did feel like that after the disasters of 1915, 1916 and early 1917, the Nobs had finally figured out how to wage war in the technical age. Limited objectives which could be taken while still in range of artillery cover, to then consolidate the position and bring the guns forwards before the next limited step was launched. If they could keep it up then they could keep the Germans off balance and maybe, just maybe, before the weather set in, they could deliver a knock out blow and the war would be done.
This wasn’t just wishful thinking on the Allies behalf. By the German’s own admissions, after Polygon Wood they were in some degree of disarray, some hardly knowing exactly where the front line was. On 28th September the 30th Battalion advance posts in front of the Butte saw a group of Germans in a shell hole only a matter of metres to their front. Believing this was the advance group of an attack, they fired an SOS flare. But the Germans threw up their hands and 2 officers and 63 men surrendered. They explained that they had gotten lost searching for their own unit and had taken shelter in the crater, unaware they were almost in the Australian line.
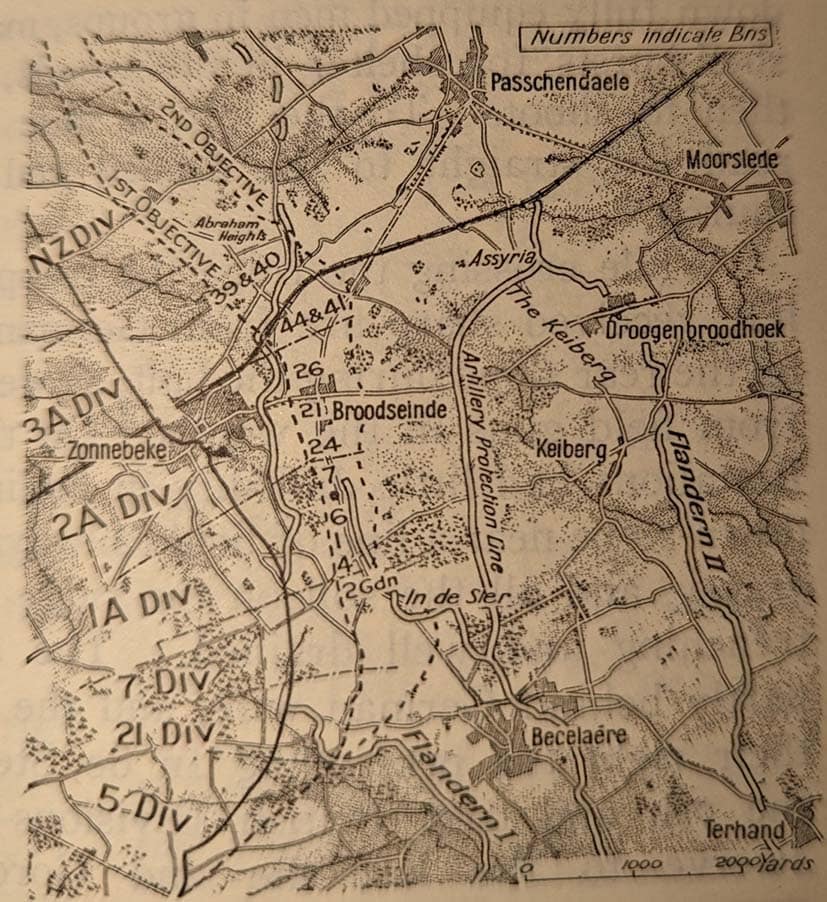
Things had gone well, but Polygon Wood in itself was not an important patch of ground. It was just a patch of ground on the way to the important feature of Broodseinde Ridge. The ridge ran almost directly north and had been in German hands since seizing it from the British during Second Ypres in 1915. Possession of the Ridge gave the Germans perfect observation over the entire salient.
It had always been the intention for 2nd Anzac Corps to make the Australian contribution to this attack. Generals Birdwood and White had thought that by this stage the 1st Anzac would be just about done in, based upon the experience on the Somme. But they had come through in good shape and so it was decided to leave them to make the third attack.
But what to do with 2nd Anzac?
It was decided that 1st Anzac and the British V Corps should shuffle around a little, creating a gap between the two. 2nd Anzac was slotted into this gap to the north of 1st Anzac. 2nd Anzac would be tasked with capture of Gravenstafel Spur on the left flank of the Ridge. From here it was felt that after the entire Ridge had been secured, 2nd Anzac would then be in position for the main show, the advance on the village of Passchendaele.
The date of the attack on Broodseinde would depend on how quickly the men of 2nd Anzac could be bought up and make their preparations. Initially it was proposed for 6th October, but the Heads were starting to get a bit nervous in regards to the weather. Even the couple of light falls of rain they’d had over the last couple of weeks made the mud a bit of a problem, but it dried out fairly quickly and didn’t hamper operations in anyway. But if the rain got serious it was likely to cause problems.
The date of the advance was bought forward by two days to 4th October.
Between 29th September and 1st October the 5th Australian Division was relieved from the positions it had captured in Polygon Wood and the 1st, 2nd, and 3rd Divisions as well as the New Zealand Divisions took up their positions (in that order from south to north).
On 1st October the 5th Battalions old position came under intense artillery fire and at about 5:30am three waves of German infantry were seen advancing. The British divisions opened up along with the southern most Australian battalion firing into the German flank. The Germans suffered heavy casualties, but managed to re-take the south eastern corner of the wood. A second attack was made in the afternoon but made no progress. This was fortunate. If a substantial chunk of the wood had ended up in German hands, it would’ve made preparations for the advance on Broodseinde a bit tricky.
With all systems Go, after dusk on 3rd October the troops began to head out to their jumping off tapes. Their mood could best be described as exuberant. They all knew that for the first time ever, the two Anzac Corps were fighting side by side. They were all keen to get in and show the Pommy commanders what this could achieve.
A drizzling rain began to fall as the troops moved forward, making the ground greasy but not drenched. The main impediment this would cause was to keep the dust down during the bombardment. This may seem like a good thing, but during the previous battles, the smoke and dust had played a large role in concealing the movement of troops from the German observers.
By the early hours of 4th October, the attacking Divisions had squeezed up as far forward as they could. Experience had told them that it was usually the troops in the follow up waves which would be subjected to the worst of the German counter barrage, so they crowded the forward most positions, allowing the barrage to do little damage. That was the theory, but on this occasion, for reason which became apparent later, the German barrage didn’t behave like it was supposed to.
An observer wrote, “At about 5.20 a yellow flare went up on Broodseinde Ridge, instead of a white (as heretofore). It was followed by a couple more and then sheafs of them. About 7 minutes later, or less, the German barrage began to come down, battery by battery. Of course we thought the attack had been discovered. It made one miserably anxious to hear it, but we had heard the same at Bullecourt and learned that our men can still attack after such a barrage.”
The main problem caused by this barrage was that it wasn’t falling on the trenches which the Australians had just vacated. It was falling predominately in no mans land, where the attacking troops were waiting for the whistle to go. But there was nothing for it but find what cover they could in shell holes to wait it out for thirty agonisingly long minutes. It is estimated that around one seventh of the attacking forces was killed or wounded while waiting for zero hour.
But that was only on the 1st and 2nd Division fronts. The 3rd Division and the 7th British Division were pretty much left alone. Surely if the attack had been discovered, the Germans would be blasting the entire position. The 25th Battalion began to have an inkling as to what was going on. From around 11pm that night, while laying next to their jumping off tapes, they’d been witnessing the movement of German troops across their front. They assumed it was just the normal relief being carried out. But it went on for hours and when the barrage began to fall, the realisation hit home. The Germans were preparing an attack of their own.
But by then it was too late to fire the SOS flares. There was only 10 minutes left before zero hour. Whatever was about to happen was going to happen regardless of the 25th knowing that it was coming. Some began to realise that if that German barrage is still going at zero hour, they were going to have to leave the comparative safety of their shell holes and advance straight through the bombardment. Imagine that. Bad enough knowing that you’re about to stand up and possibly make a decent target for a random machine gun bullet. The realisation that machine guns are the least of your immediate problems can’t have been comforting.
Then at 6am the British barrage commenced and at the same time the German barrage stopped. The attacking troops stood up, lit cigarettes and moved forward. For those troops, it became immediately obvious that this barrage was not of the same intensity as that which had supported the previous attacks. Some of the men actually had trouble determining whether it was the barrage or just a few of their own shells falling short. Regardless, on they went.
After covering about 150 yards, the men of 1st Anzac saw, in the dim light, a line of troops rising from shell holes right across the line. Some were a bit unsure about what was going on, but most clued on pretty quickly. This was the commencement of a German attack. There’s only one thing to do in these occasions – get in the first blow. An Australian officer described it, “ the men blazed at once from the shoulder; one Lewis gunner on the left centre got down at once and opened fire. The Australian line did not stop for a moment. The Germans fired a few scattered shots and ran at once. Some of our chaps shouted ‘they’re your own chaps – don’t fire.’ Others responded ‘Mind your own bloody business.” Most of the men went on shooting.”
Not all German troops ran though. Some came on with bayonets fixed and a brief and brutal struggle ensued. But too many Germans had run and the Australians soon dealt with the rest. Documents captured later in the day showed that the Germans had planned their attack almost along the same line as the Allied forces. Zero hour for both attacks had been set for the same time. The only difference is that the Germans planned a half hour preliminary bombardment to cease at zero hour, whereas the British gunners held their fire until zero hour. It was harsh proof that the new British practice of providing a creeping barrage to support advancing troops was superior to the previous notion of a preliminary bombardment.
In front of Zonnebeke, the Germans fell back in good order under the control of NCOs. They fell back 30 to 40 yards at a time, turned and opened up with rapid fire until falling back further. Machine gunners hid in cellars and as the 25th passed them by, the Germans fired into their backs. But in doing so, they betrayed their positions to the 26th Battalion who were following up behind and the guns were soon silenced.
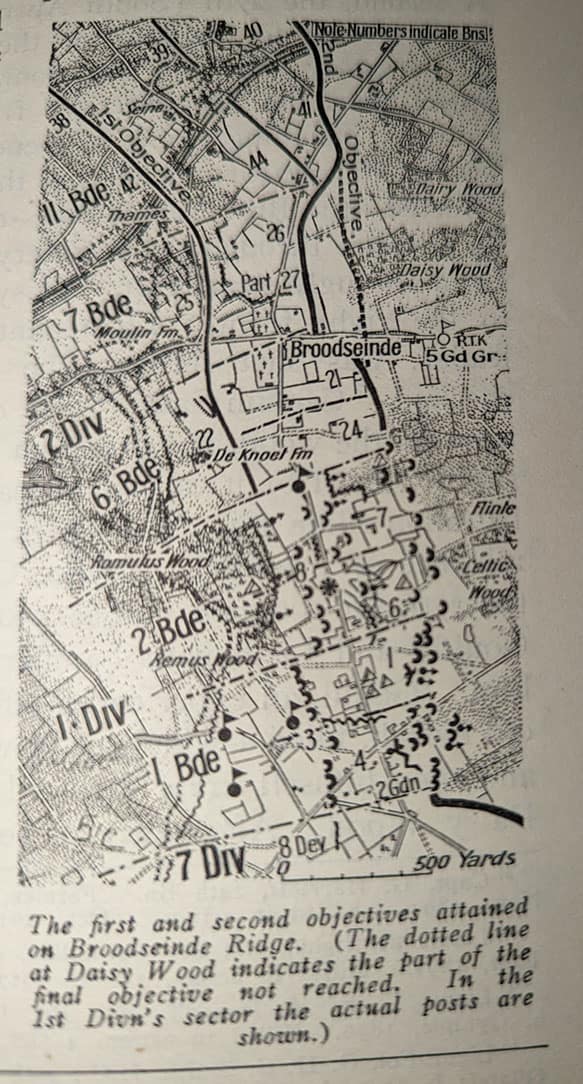
Unlike at Polygon Wood, the Germans inside their pillboxes stood and fought on most occasions. After dealing with the German attack, the 1st Division almost immediately came under fire from a collection of pillboxes and ruins. Every officer of the 8th Battalion’s left flank company was hit. However, the Division pushed on, taking pillboxes and made the first objective halfway up the ridge. The 2nd Division had a similar tough fight with pillboxes, with many garrisons refusing to surrender. But they too succeeded in reaching the first objective.
Remember that during the Battle of Polygon Wood, the Germans had managed to retain control of the crest of Windmill Cabaret Ridge. Well that now began to cause some issues. 2nd Anzac Corps advance first had to overcome this position. Their barrage was apparently a bit thicker than that of 1st Anzac. The 3rd Division, in its first fight on the Western Front went forward like their more experienced sister Divisions. The 43rd Battalion in van of the right hand brigade was first to meet the Germans. A machine gunner opened up from a pillbox while others threw grenades from the hilltop. These were all quickly sorted out, with the Germans falling back.
The 10th and 11th Brigades pushed forward and crested the ridge and then headed down into the valley and onto their first objective of Gravenstafel Ridge. They took fire from a particularly stubborn pillbox, but a phosphorus bomb hit the strongpoint and the 3rd Division attained its first objective.
The Kiwis to the Northern, left flank had to make their way across a bog before they could join their Australian comrades on the final objective. This was known about in advance and so the plan called for a halt of 12 minutes to allow the New Zealanders to negotiate the obstacle. During this break the 3rd Division consolidated their position, establishing communications with the rear and rounding up German prisoners.
When the advance recommenced, the 11th Brigade, with the 42nd Battalion from Queensland leading, went forward in good order and reached the red line. At this point the left flank of the Brigade took fire from a pillbox at Alma and a gap opened up between the Brigade’s centre and left. Lieutenant Dunbar of the 42nd saw the danger and led two platoons across the front of Alma and seized three pillboxes and the centre was able to recommence it’s advance.
For some reason the barrage in front of the 10th Brigade continued to fall on the halt position for a full 26 minutes after the halt was due to end. The 10th had no choice but to sit and wait for it to begin to move forward. Meanwhile they watched the New Zealanders shake themselves out to the correct spacings and head forward in good order. Then, to make matters worse for the 10th, the German artillery chose this moment to get back in the game and started shelling the waiting troops. What a bugger of a situation. Can’t go forward because you’ll be blown apart by your own artillery, but the German guns were making life difficult in their current location. And then a well concealed machine gun added its weight of fire to increase the discomfort.
I can imagine there was some colourful language being directed at the British artillery at that point.
But eventually the barrage began to move forward and the poor buggers of the 10th were able to get moving again and soon the entire line was on the 1st objective, the Red Line.
Here they were supposed to stop and reorganise for the attack of the summit of Broodseinde Ridge, but the Germans weren’t adhering to the script and it was during this halt that some of the heaviest fighting occurred. Upon reaching the Red Line groups of Germans were seen retreating and many Australians, with their blood well up, chased after them. Their protective barrage was still thin and many didn’t realise that they were in fact advancing in front of their own artillery. On the extreme right, the 4th Battalion, mixed up with troops from the 2nd Gordon Highlanders pushed forward and nearly reached their second objective. Seemed pretty easy.
But for the centre and the left it was not the case. Just before reaching the Red Line, as the 1st Division troops were emerging from Romulus and Remus Woods, the German artillery began to fall among them. The 3rd Division similarly came under accurate fire. Captain Traill of the 8th Battalion was the first to realise what was happening. The German guns were firing over open sights.
What does that mean, you may well ask.
Well normally, artillery is directed by a forward observer calling the coordinates back to the guns. The guns would then fire on that map position. But, if the targets were in direct view of the guns, they could more or less just point the gun in the general direction and fire. Thus, as the advancing troops moved, the guns could be easily manoeuvred to follow without the time lag it would normally take for the message to get from the observer to the gunner.
This is not a good thing for an attacking force. It’s basically sniping with big guns.
But this wasn’t the only problem.
The top of the ridge was in places up to a quarter of a mile wide with a road running the length of the ridge for almost a mile and a half. But there was a large crater near the centre of the road and the rail cutting about a half mile to the north. These positions held numerous headquarters, artillery observation posts and dug in pillboxes. The positions running from the crater to the rail cutting could not be outflanked as they were each supported by their neighbours.
But as always seems to happen in these instances, the true leaders came to the fore, be they junior officers, NCO’s or just Diggers who automatically took the reins. From just behind the crest, Lewis Gunners laid down suppressive fire while rifle-grenadiers helped convince the Germans to keep their heads down. The attackers would then rush forward and seize the strongpoints with rifles, bayonets and pistols.
The main position at the crater took twenty minutes to subdue. This position was supported by about 30 Germans from a ditch to the south, but the rifle-grenades forced them from their position and they were captured. The crater was then surrounded by two parties under Major Taylor and Captain Annear of the 6th Battalion and they rushed to the lip. Shooting down from the rim Captain Annear was almost immediately killed, but the rest of the force was able to evict the defenders, many of whom retreated back to a trench behind a hedge and continued firing.
But when the rifle grenades began falling on the trench and realising that all escape routes were now covered, the garrison surrendered. All except one who was bayoneted. It turned out that this was the Battalion commander, who chose death over capture.
Meanwhile, a few hundred yards to the north, those guns firing over open sites were still causing trouble. Captain Traill and Lieutenant Hickson led some troops of the 7th and 8th Battalions to the guns, which ceased firing as the troops got close. But the guns were guarded by entrenched machine gunners and infantry with bombs as well as troops in the ever present pillboxes.
As occurred down at the crater, Lewis gunners and rifle grenadiers laid down suppressive fire while the main parties edged their way forward. They managed to get so close that German bombs were actually falling behind them. They rushed forward and routed the garrison. It turns out this was the artillery headquarters and most of the defenders were shot in the taking thereof.
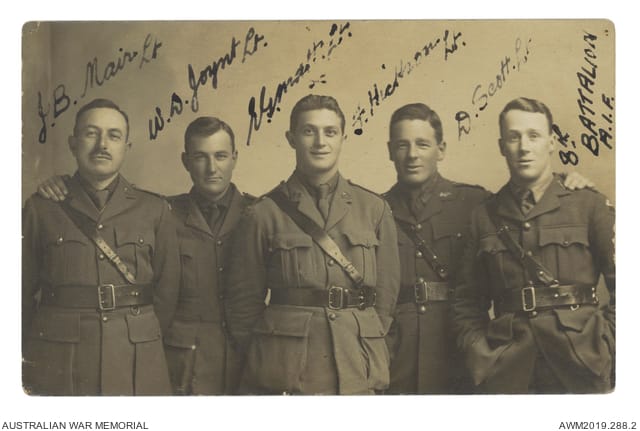
Lieutenant Hickson was awarded the Military Cross for his actions. His citation read, “For distinguished gallantry during the attack on Broodseinde Ridge east of Ypres on 4/10/17. This officer was in command of a company throughout the operation and led them with unerring skill and judgement. His calm thoughtful action during one period of the attack undoubtedly saved many lives. Seeing his flank Company held up by machine gun fire, he immediately swung a portion of his line to assist and personally went forward with his revolver shot four of the gun team and captured the remainder and the gun, thus allowing the line to reform and advance.”
Lieutenant Hickson joined as a Private in October 1914 and survived the war, but died on 18 April 1920. Unfortunately, I’m unable to tell you the cause of death because all I’ve managed to find is his funeral notice, which only gives details of the funeral. I always find it particularly sad that blokes who survived four years of the most destructive war the world had seen up to that point, die shortly thereafter.
Anyway.
In front of the 2nd Division the barrage had been a bit denser, but when the troops saw Germans retreating from the Red Line position, in places they pushed through their own barrage in pursuit. A few men turned the recently captured field guns around and tried to use them against their former owners. Sniper fire soon forced the Australians to take cover.
At this point, observers from the 8th Battalion noticed German reinforcements rushing towards the 21st Battalion section of the line. From their position on top of the ridge, the observers were able to signal directly to the supporting artillery who dropped a barrage on the assembly area and broke up the counterattack before it began.
The German counter attack was part of a reorganised German defensive strategy. During the Battle of the Somme in 1916, the Germans held large numbers of troops in the front line, with counterattack immediately behind. At the Somme this proved to be a problem as it meant that all those troops were subjected to the preparatory bombardment. As a result they had adopted a defence in depth strategy throughout the early part of 1917. This involved maintaining a small number of troops in the front line, with the counterattack troops further back. Thus, fewer troops were subjected to the bombardment. Those who survived could then disrupt the Allied advance, but were not expected to defeat the attack themselves. If the position was taken, the counterattack could go in, relatively unscathed and evict the battered remnants of the Allied attack.
It had worked pretty well for them.
But after the losses at Menin Road and Polygon Wood, it became apparent to the German command that this strategy didn’t work against a creeping barrage with limited hops to seize objectives, secure them and then move on at a later date. At a meeting with his senior commanders, Ludendorff was told that with the reserves held so far back, by the time they came forward it was too late as the attackers were now generally secure and still able to be supported by their artillery. So prior to 4th October, Ludendorff reluctantly agreed to have reserve battalions close to the line to expedite the counterattack.
Under its first true test you’d have to say the results were mixed. They hadn’t managed to expel the attackers from the Red Line, but they did manage to disrupt the preparations for the next stage, although it has to be said, not by a great deal. By the time the second hop was due, most of the Anzac and British Battalions were more or less ready to go. Most of the troops who had overshot the mark had been bought back, except for some of the men of the 4th who had been mixed up with the Scots. Captain Judge advised the Colonel that he would order those men to take cover in shell holes to avoid the barrage.
At ten past eight, after four minutes of intense shelling, the second stage got underway. The 1st and 2nd Divisions almost immediately crested the ridge with little opposition. The view laid out before them must have seemed unreal. Since May of 1915, the Ridgeline had marked the end of what the Allies could see to the east. Their part of the world at this stage was devoid of vegetation, shell blasted with all the detritus of war scattered about. By contrast, the eastern side of the ridge had seen very little destruction since it was first fought over in the early months of the war. The Diggers were now presented with mostly green fields, with only the occasional shell hole, a light scattering of trees which still had leaves on them and even cows grazing. Off in the distance they could even see the spire of the church at Passchendaele.
It’s sad to think that those green fields would soon become the waterlogged wasteland that most people associate with the Battle of Passchendaele. Tens of thousands of men would die down there in the coming months in what most Great War veterans would say was the worst conditions of the war.
But at this point, those green fields must’ve filled the troops with hope and optimism.
To the right of the Australians, on the Southern flank of the battle, the British 7th Division’s second objective was the In de Ster Plateau. The main Broodseinde ridge runs basically north south, but at the In de Ster Plateau it turns to the east at about 80 degrees. Possession of the Plateau allowed the British to occupy the bottom of an L shaped battlefield, which meant they could now hit the German defenders in front of the 1st and 2nd Australian Divisions from the side, as well as German reinforcements who were moving to the battle. For the non-militarists out there, this is known as enfilade fire.
There’s very little a defending force can do against enfilade fire, particularly if it’s coming from high ground. The 1st and 2nd Divisions advanced down the slope. The 24th Battalion was making its way towards a hedge which the intelligence maps had identified as a German Headquarters. It was indeed the HQ of the 5th Guards Grenadiers, but as they were advancing their artillery dropped white smoke shells to indicate that the objective had been reached. The 24th had to let the HQ staff escape.
Both Divisions dug in on their objectives, only being troubled by snipers who took a heavy toll on officers and NCOs. In the official history, Bean states that stretcher bearers were also sniped. I’m not doubting the great man, but that would be a bit of departure from normal behaviour. The Germans, in fact all combatants were pretty good at not specifically targeting stretcher bearers. One, because it was against the rules of war to do so, and two most of the men understood that it was highly likely they would end up on a stretcher one day and they’d be hoping that their bearers would be left alone to do their job.
The toughest fighting of the second stage took place to the north of Moorslede Road, on the left flank of the 2nd Division section. Leading the 7th Brigade was the 26th Battalion of Queenslanders and Tasmanians. Their objective was a line from the village of Broodseinde, north to a rail junction. Early on in the second stage the Battalion passed through an old church cemetery and at that point they were fired on by a machine gun situated in Daisy Wood, a couple hundred yards to the front. Lieutenant MacDonnell was killed and the advancing troops wavered until Captain Smith took command and got the men advancing again, but heavy fire from behind hedges and the rubble of destroyed buildings drove them back to find shelter in an old trench.
The 26th had suffered such heavy casualties that a gap had opened up between the 6th and 7th Brigades. The 26th wouldn’t be able to resolve this issue without reinforcements so a message was sent back to the 27th Battalion to send up 100 men. Two companies under Captain Gould and Lieutenant Lampard arrived shortly before 10am. Gould conducted a quick reconnaissance of the area and decided that the trench they were occupying would provide better view over the battlefield than they would have from Daisy Wood so he ordered his men to dig in.
As they dug they kept digging out old British uniforms, with the remains of their former owners. These were the dead from the British 28th Division who had held this trench in 1915 during the Second Battle of Ypres. Two years and many thousands of casualties later, the Allies were once again occupying the same trenches.
The gap had been sealed and Lampard’s company made contact with the 6th Brigade’s 41st Battalion. The 6th Brigade formed the right flank of the 3rd Division, making this the junction of 1st and 2nd Anzac Corps.
The 3rd Division advanced towards Abraham Heights during the second stage of their advance. This required them to cross the old German defensives and while negotiating the old barbed wire and swampy ground the 44th and 41st Battalions were unable to keep up with the protective barrage. As the shelling moved beyond the German pillboxes, the machine gunners opened up and once again the pillboxes needed to captured one by one. Two pillboxes in particular kept the Battalions pinned down. It was only after Lieutenant Brenner of the 44th and Lieutenant Fraser of the 41st took each pillbox in turn that the troops could once again continue their advance.
The 39th Battalion advance was going well until they began to receive fire from their left, from in front of the New Zealand sector. The advance stalled until a party from the 40th, which was following behind the 39th, charged the machine gun and freed the 39th who went onto their final objective.
The only problem was that this delay meant that the barrage had moved forward and the 40th, which was to pass through the 39th and take the final objective, were unable to catch up. The were then subjected to severe fire from Flandern I Line. This German position lay just over the crest of the ridge. The 40th’s objective was just short of the summit where the Grafenstal Spur crossed the Flandern Line. The German trench was totally destroyed but they still managed to pour a withering fire from ten machine guns located in the trench and supporting pillboxes. The Tasmanians could only advance in small hops, suffering heavy losses on each hop.
Something had to be done or else the advance would either sink into the ground or all of the troops would be wiped out. Captain Ruddock saw that if he could lead a company from the left flank into the New Zealand sector, he’d have decent cover from which to lay down supressing fire. He got his company into position and opened fire. It had the desired effect, allowing some degree of forward movement, but still each strong point could only be taken by acts of extreme bravery by small groups and individuals.
In this way the 40th achieved its objective by shortly after ten past nine. The Kiwis on their left also gained their objectives at about the same time. By mid morning, from North to South all objectives had been seized, except the small dent in front of Daisy Wood, which as I said early, was actually a better position than the stated objective, so we’ll call that one a win as well.
But obviously this doesn’t mean the battle was done. The protective barrage would continue for a further two hours, during which the men dug trenches, established communications and got resupplied with ammunition, food and water, relatively safe from counter attacks. A German barrage was laid down, but they were clearly in the dark as to exactly where the Anzacs were. Much of the barrage fell behind the front line, and while this made things difficult for the blokes bringing supplies up and the stretcher bearers taking wounded back, the main line was pretty comfortable.
On the right flank, the British troops firmly installed on the In de Ster spur pretty much guaranteed that no attack would be possible in that area. But further to the north some attempts were made to dislodge the Allies, but all were beaten off, particularly from the position overlooking Daisy Wood. Turns out that was actually a very strong position.
On the 41st Battalion’s front a group did manage to establish themselves in some old trenches about 200 yards away. From there they were able to subject the Australians to accurate fire. According to a witness on the spot at the time, Lieutenant Skewes, formerly a miner from Charters Towers, said “Oh bugger it, we’ll go out and stop this.” He led a group out and worked their way towards some shell holes about 50 yards short of the Germans. Then Skewes said “Damn it, we’ll give it a go – get ready to charge.” He gave the signal and as his men sprang up from their holes, shouting for all they were worth, the Germans also jumped up, and ran away, pursued by Skewes and his men, firing from the hip.
When they returned to their positions Lieutenant Butler noticed Skewes wasn’t with them. He went back out and found Skewes was dead. He tried to move Skewe’s body into a shell hole, but was wounded in the process.
Other counter attacks were launched throughout the day, but the Germans were in disarray. Remember that at 6 that morning, they thought this was going to be a day when they were the ones doing the attacking. They never expected to be on the receiving end and to very quickly turn from an offensive fight to a defensive one. Troops who thought they were going to reinforce the leading battalions were now having to go in against strong positions which at the start of the day had belonged to them.
At one point, while a Battalion was massing for its attack, observers in front of Daisy Wood called in artillery and many of the troops stood and tried to run. But mounted officers slightly further back just rounded them up and sent them in again. The German’s resolve had obviously taken a serious hit.
None of the counterattacks seriously threatened the Allied lines. So you may ask the question, why didn’t the Allies keep pushing against an enemy which was obviously a shaky as they had ever been during the war? Surely now was the time to land the knockout.
Unfortunately, this wasn’t possible because the advance had now reached the extreme range of the supporting guns. In the 3rd Division sector, some of the shells were falling short, dangerously close to the troops. Any advance would have to be conducted without artillery cover. That could possibly risk all the gains made up to that point. And let’s face it, everyone knows that in World War 1, you don’t advance without artillery. So all that could be done was to consolidate while the guns were moved forward again and all the necessary preparation for the next phase were carried out.
Broodseinde was probably the most important of the battles leading up to the final attack on Passchendaele. It had succeeded in shifting the Germans from one of the strongest positions in Belgium. It had rocked the confidence of the German troops and their commanders. These three battles of Menin Road, Polygon Wood and Brooseinde had pushed them back with ease and there seemed very little they could do to stop them. Even altering the defensive strategy by putting more troops in the front line had only resulted in those troops being overwhelmed.
Their carefully laid out defence in depth system was in disarray. In fact most of that defensive system was now on ground held by the Allies. Quite a few senior commanders would’ve been sweating bullets. They needed something to turn their fortunes around. They needed help from the heavens. And they got it.
The Autumn rains began shortly after the victory at Broodseinde. Those lovely, fresh green fields the troops saw when they crested the Ridge soon turned into sodden wastelands and the Allied offensive bogged down. The following battle for the village of Passchendaele would become a by-word for horror, misery and a waste of lives. And we will cover that in a later article, but for now I think three fairly heavy articles on World War 1 is enough for now.
But for now, a great victory had been won by the Australians with their Kiwi and British brothers. The 1st Division had suffered 2 448 casualties, killed wounded and missing. The 2nd 2 174 while the 3rd, in its first fight on the Western Front suffered 1 810. That’s 6 432 casualties. Add to that 1853 New Zealanders and 5 500 British you get an idea of what even and easy victory cost. But despite that, the three battles we’ve covered led to a feeling of confidence and hope among the Allied armies. A feeling they wouldn’t see again until August 1918.
Related stories: Menin Road: Warwick O’Neill; Polygon Wood: Warwick O’Neill.
Other military items by the author, Warwick O’Neill, can be found at: https://www.australianmilitaryhistorypodcast.com/
You can read more about the author, Warwick O’Neill, here.
