
Warwick O’Neill, Military Historian
You may or may not have guessed, but the Australian involvement in World War 1 is my personal area of interest. And the next three articles will focus on a series of battles from 1917 which, in my humble opinion, were the battles which cemented the reputation of the AIF on the Western Front.
Sure, the previous years had shown that they were resilient, hard fighters and men who could be trusted to get the job done. But these three battles showed them to be among the best, if not the best, assault troops in the Allied armies. The speed and efficiency with which they captured ground, consolidated and then pushed on with the next phase really did have the Germans on the run. They generated the feeling that maybe, just maybe, if this momentum could be maintained, then the war could be over by the end of 1917. Obviously this didn’t happen as the weather, as much as the Germans, halted this momentum at Passchendaele. But these three battles proved to the Australians and the rest of the British army what they could do if the conditions were right.
In 1917, General Haig set about planning what he felt would be the decisive battle of the war. He would launch an assault in the area around the historical town of Ypres where he was certain he could punch through the German line and seize the high ground around the village of Passchendaele. This battle would come to be known as the Third Battle of Ypres or more commonly, just Passchendaele.
However, the English Prime Minister, David Lloyd-George had heard all this before. The previous year on the Somme, Haig felt he would deliver Germany the knockout blow and end the war, but instead suffered around half a million casualties and the dubious entry in the record books of the bloodiest single day in English Military History, 1st July 1916. Lloyd-George didn’t want to give Haig such free reign on the use of troops again. As PM he couldn’t override Haig on strategy, but he did have control over manpower, meaning he controlled Haig’s reinforcements.
He decided to use this power to try and avoid another disastrous slaughter. He gave Haig some pre-requisites. No massive, single frontal assault ala the Somme, but a series of set-piece battles. Each stage of the battle would have to be a success before Lloyd-George would release the manpower Haig would need to conduct the next phase. He hoped this would stop the General from pouring men in to retrieve a lost cause.
Haig put his Generals to work planning the set piece battles as decreed by Lloyd George, which he felt would advance him towards his final objective. The Battle of Menin Road, The Battle of Polygon Wood and the Battle of Broodseinde Ridge would be the Australian contribution. In this article we’ll look at Menin Road and over the following articles we’ll take care of Polygon Wood and Broodseinde.
It should also be mentioned that the first steps in the Third Battle of Ypres were the Battles of Messines and Pilckem Ridge. Messines did involve Australians, being the 3rd Division, but I have decided not to include it in this series of episode on Third Ypres as basically the Aussies played a minor role at Messines, it doesn’t really fit with the ‘theme’ of these battles where Australians played pivotal roles. But for now, just keep in mind that the Battle of Menin Road was the third main step in the greater Battle of Third Ypres.
The traditional image of the Third Battle of Ypes is the glutinous mud, drowning men and horses unfortunate enough to slip off the duckboards. But that really only relates to the latter part of the battle after the autumn rains had set in during October.
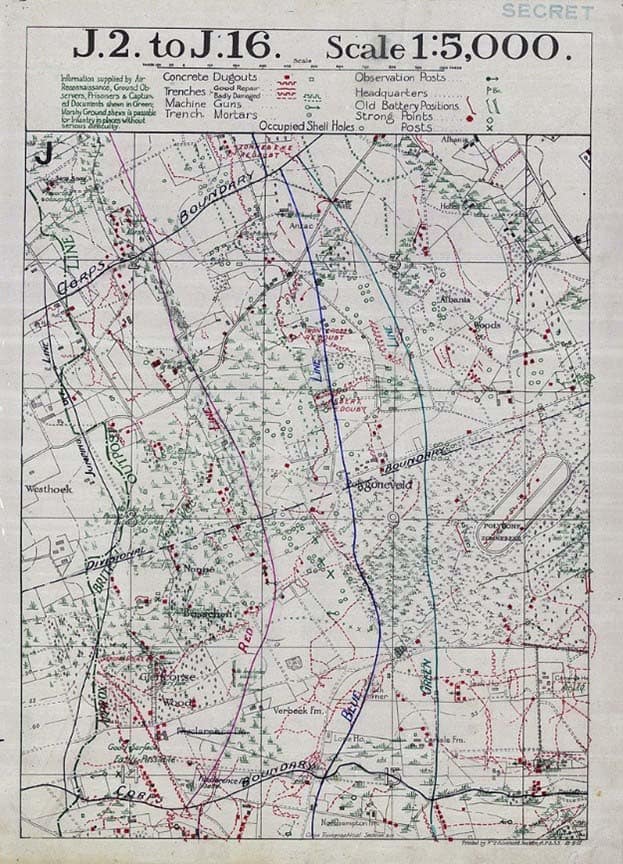
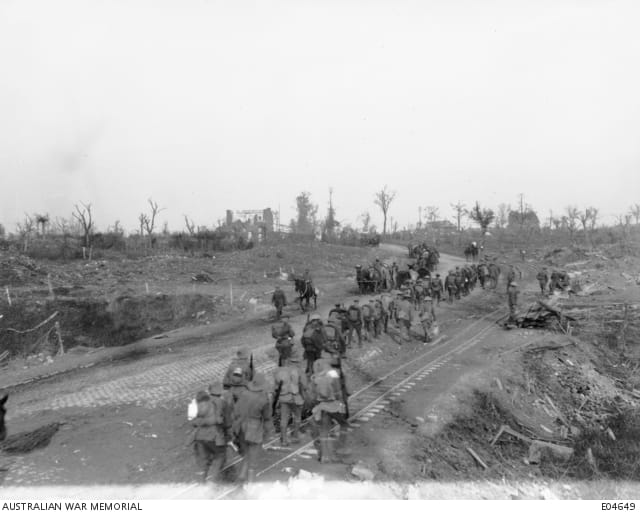
During the opening stages the ground was firm, the weather dry and warm although there was a distinct chill in the air at night, signalling that another winter was heading for the Western Front. It was at this time, from the 20th to 26th September 1917 that the 1st and 2nd Australian Divisions, as part of the British Second Army under General Plumer, fought the Battle of Menin Road. With them were South African and English Troops.

Plumer’s objective was the Gheluvelt Plateau, which the Menin Road intersected. He planned to take it in a series of four steps with six days between each thrust. The intervals were to allow artillery, supplies and communications to be moved forward in preparation for the next phase. This was a different approach to previous battles where the plan was to batter the enemy with artillery and advance for miles, to the limit of the gun’s ability to support the advance. Another change was that in each of Plumer’s attacks, one Battalion was to secure the first objective in each sector, with two Battalions then advancing on the second objective. This was the reverse of how they usually did things and was intended to counter the new German defensive tactics.
They had taken to manning the front-line trench thinly, with a large force held further back. The front-line troops would hold the attack up as much as possible, but if the British broke through then the stronger forces in the rear would be thrown against them. By putting two Battalions into the second objective, Plumer hoped to nullify this tactic.
Leading up to the Battle, the British and Australian artillery conducted two practice barrages each day. Working to a plan, for anywhere from half an hour to two hours, they worked their shots across the German positions. The final shots of each practice were always aimed at the starting line of the attack. It was hoped that this would have the effect of conditioning the Germans to that style of bombardment and convince the majority of their troops to remain underground, even after the first barrage had lifted. It’s these kinds of changes, or experiments really, that kind of debunk the idea that all English Generals were dullards who never tried anything different. Of course many of them were, but there were just as many who were willing to think outside the military box.
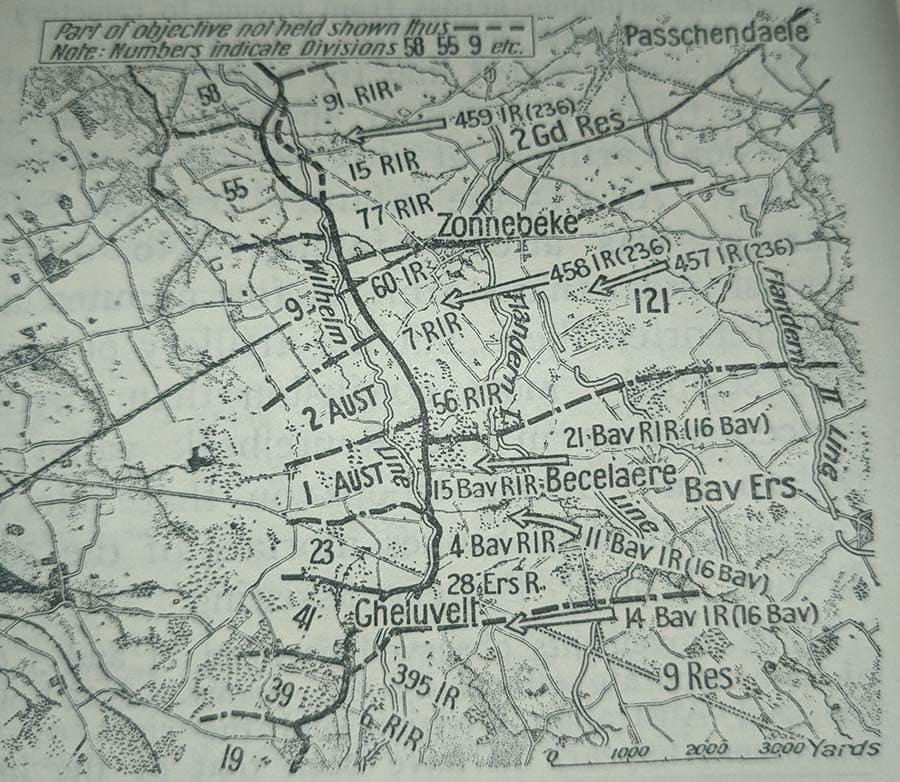
The terrain which the attack was to be fought over has been compared to an open pair of scissors with the Ypres-Roulers railway on one side and the Menin Road on the other, intersecting at “Hellfire Corner” and then diverging again. It was between these ‘blades’ that the Australians would attack with English Divisions on their right and South African and Scottish Divisions on their left. The Australian’s objective was the main ridge and Anzac Spur, with the 1st Division seizing the main ridge and the 2nd Division taking the Spur.
The day before the battle was due to commence, 19th September, was clear and sunny and so the attack was given the go-ahead. Troops moved to their assigned areas and waited. Under the cover of darkness they moved forward to the jumping off tape. Unfortunately the weather turned and by 11:00pm a steady rain had set in. The Commanders considered whether or not they should postpone, given the ground would be slippery and difficult to manoeuvre over.
General Birdwood phoned General Walker, commander of the 1st Division, and was advised that the conditions were not good, but promising to improve with the rain decreasing and the wind rising. He proved to be correct and shortly after midnight the rain eased. Plumer had formed a similar opinion and it was decided the battle would go ahead as planned.
An onlooker in Hooge crater, on the southern flank of the Australians, said of the men going forward “The 12th Battalion is passing now, rather late. Although the sky remained overcast, the rain did not recur. The march had continued steadily through it, and, to onlookers, the manifest confidence of the strong figures constantly passing, and the unhindered movement of diverse preparation along the Menin Road, were highly reassuring.”
The rain did cause some issues though. Some of the hastily laid out tracks leading units to their jumping off points were washed away, with the result being that groups strayed and had to hurriedly re-orient themselves when they realised they were occupying positions designated to other units. The 5th Battalion were caught on the Zillebeke flats by a German gas bombardment. Forced to wear the cumbersome gas masks with their limited visibility, combined with the washed-out tracks, the Battalion’s machine gun company lost touch with rest of the Battalion. They only managed to re-join their comrades shortly after the advance had started, when Lieutenant J Bourke took his two gun teams across the advance and were finally able to render assistance.
The 2nd Division was in place by 4:14am, but the 1st Division was still moving forward at that stage. With the forward-most jumping off point only around 150 yards from the Germans, the 1st Division was taking extra care to avoid unnecessary noise and by zero hour it appeared that they were all in place and undetected.
That’s not to say there were no casualties suffered in moving forward. In the early hours of the 20th the Germans captured an Australian officer who was found to have battle orders in his possession. Although it didn’t provide specific dates, it did confirm that an attack was imminent. They may not have known the exact locations of the attacking force, but they did know the ground, and could have a pretty good guess at where the jumping off points for a potential attack would be. They intermittently lobbed artillery on these areas.
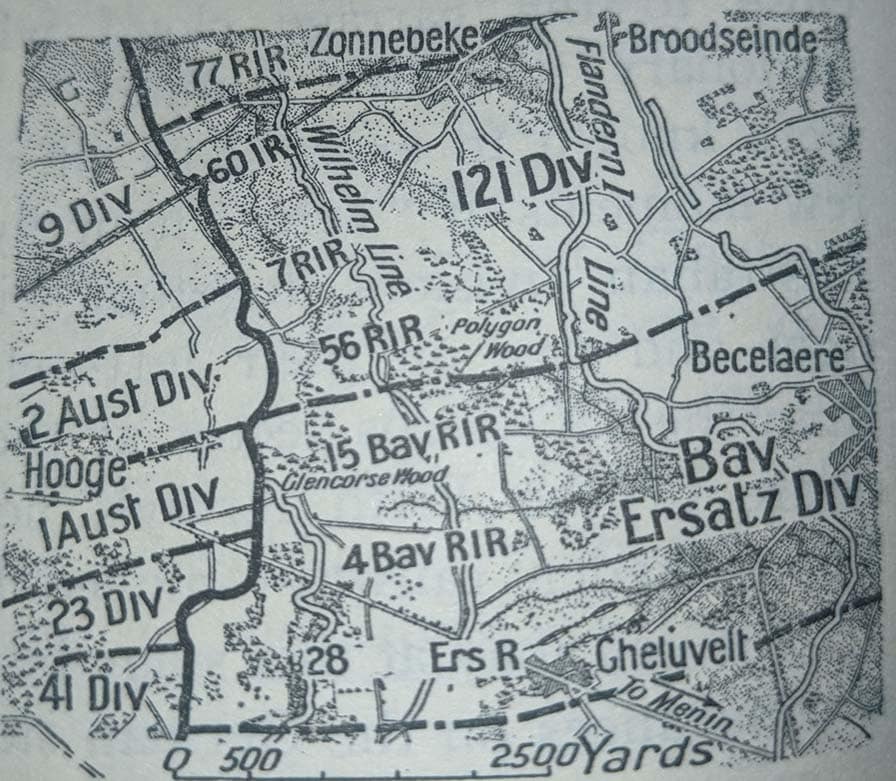
In front of the 1st Division were two regiments of the Bavarian Ersatz Division while the 2nd Division was opposed by two regiments of the 121st (Prussian) Division. After the Battle, the British found these two divisions had possessed the highest concentration of artillery in the Ypres sector.
At Glencorse Wood a heavy barrage was put in by the Germans in the area of the 3rd Brigade. The 11th and 12th Battalions escaped with comparatively light casualties, but the 9th and 10th were caught in the middle of it as they moved forward. The 9th Battalion lost all of its company commanders and about half of its junior officers. As was becoming usual in the AIF, when the higher ranked leaders were killed, there was always someone junior who stepped up and filled the void. In this case, Lieutenant Meyer gathered the scattered survivors and led them to the starting off point.
At 5:36am a series of flares went up from the German positions in front of the 5th Brigade and soon a concentrated barrage was falling on the Brigade. Captain Barlow looked at his watch and figured that, as there were only three minutes to go before zero hour, he might as well get the ball rolling early. He jumped up, blew his whistle and led his men forward to get them out of the barrage. Either side of him, the other company commanders followed his example and shortly afterwards at 5:40am the British artillery and machine gun barrage opened up and the battle was officially on.
At this stage, before we get on with the actual details of the battle, it’s interesting to note the German perspective. The two-week delay in fighting which led up to the Battle of Menin road confused the German hierarchy. The diary of Crown Prince Rupprecht on 12 May, a week before the battle, states “The Flanders fight seems actually to have ended. We can consider pulling out several divisions.”
His chief-of-staff felt that it was difficult to believe the English had given up the battle, but maybe they are just moving it to a different sector. So when the preparatory barrage began, the German High Command assumed it was just a diversion.
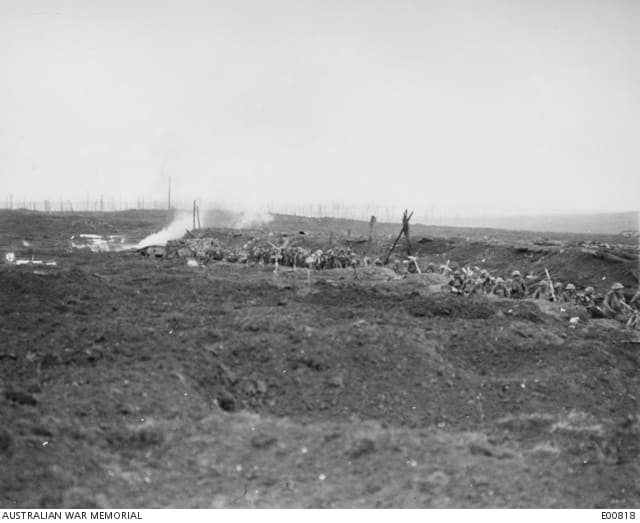
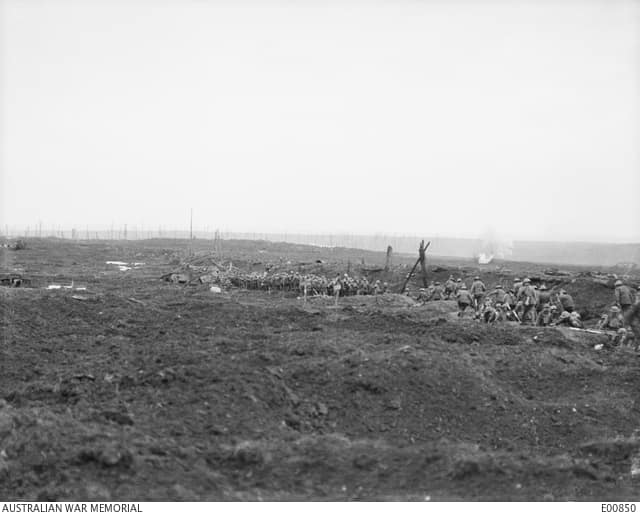
With the sun just showing above the horizon, the whole area was quickly covered with dust and smoke. Those soldiers not already advancing alongside Captain Barlow rose from their positions, lit cigarettes and moved forward behind the screen of the barrage. This new kind of bombardment was called a ‘creeping barrage’. For the first three minutes of the advance, to give the troops time to stand up, prepare themselves and to begin to move, the barrage stayed where it was. After three minutes the gunners raised their sights and began walking their shells forward in stages. This convinced the front-line Germans to keep their heads underground and not shooting at the attackers. Then, once the barrage had passed, the troops would be into the enemy trenches before the defenders could man their positions.
This was the first occasion on which two Australian divisions had attacked side by side and neither Division was going to waste the opportunity. Knowing that another Australian Division was attacking on their flank gave them complete confidence. They were also acutely aware that if they were ever to fight side-by-side again they had to give a good account of themselves now to prove how formidable they could be.
And also, in typical Australian sportsman style, they wanted to compete against each other, to be the first to take their objectives. The 25th Battalion from Queensland happened to be alongside the 9th Battalion, also from Queensland. Each one wanted to be the first Queensland Battalion to get among the Germans and so they basically raced each other forward. Even in war, boys will be boys.
This keenness, when combined with the German barrage falling around the jumping off area, led to the rear-most sections catching up with the foremost and causing dangerous crowding. However the rolling barrage meant that the German machine gunners were too busy keeping their heads down to inflict any damage on the bunched troops.
In the end it was the barrage which won the day. As pointed out by an officer afterwards “the barrage won the ground, the infantry merely occupied it, pouncing on any points at which resistance survived.” But that’s not to say things were easy for the infantry.
The Germans had constructed a large number of concrete Pillboxes and although crews of some seemed to be dazed by the bombardment and surrendered with little fight, others put up a strong resistance to the advancing Australians and had to be dealt with one at time. Rather than extended fighting taking place across the line of advance, the attack developed into a number of separate fights, each attempting to remove small pockets of resistance.
According to Charles Bean in the Official History, during the planning phase it was thought that the areas in which they could expect the stiffest resistance were, on the 1st Division front, a deep sunken road on the northern edge of Glencorse Wood and the debris from the remains of the wood itself. In the 2nd Division sector, the broken ground around Hannebeek Swamp and the bogs near Nonne Bosschen.
This proved to be a rather astute observation. At Glencorse Wood, German machine gunners had established a light machine gun on the roof of a pillbox. Sweeping the front from this comparatively safe vantage point the gunners held up the advance of the 11th Battalion from Western Australia. Five minutes of fierce fighting ensued with the 11th trying to push forward with bombs and revolvers. The 10th Battalion was partly mixed up with the 11th. Its commander, Colonel Wilder Neligen had specially trained his Battalion for just this sort of situation. He had organised two of his companies as storm companies and seeing the opportunity to put their training into action, Neligen sent Lieutenant Leavers with a platoon to get around the pillbox.
Leavers managed to get the platoon behind the pillbox and was within striking distance of the machine gun when a German saw him and shot him in the head. Neligen later said that with the death of Leavers the men went mad. One corporal rushed forward, shot the machine gunner and disabled the gun. The Germans then tried to surrender. Technically that should’ve been the end of it. But the Australians would have none of it. They hurled bombs into the pillbox, killing many of the occupants before they finally allowed around 40 of them to surrender.
To the letter of the law, what these Australians did was a war crime. But, put yourself in their position. They’d just covered a patch of ground being raked by machine fire. Their mates were getting killed and wounded. They themselves were probably quite highly strung by the prospect of getting killed or wounded themselves. Then, their platoon commander gets killed and now, just when they’re about to get stuck into the men who have inflicted all that terror over the last couple of minutes, those men throw up their hands to try and save their own lives.
In that position, what would you do? I’d say it would take a person of immense self control to flick the switch from ‘kill them all’ to ‘oh they’ve surrendered. Fair enough.” I don’t reckon I could’ve done it.
Anyway, onwards at Menin Road.
With that particular pillbox neutralised, the officers hurried the lead troops along to catch up with the barrage while the following companies were left to mop up any other pockets of resistance. It was while the fight at the pillbox was developing that one of the problems of the practice of having following waves carrying supplies for the subsequent stages of the attack came to the fore. When the advance waves got held up, the carriers weren’t content to just sit back and wait, they got into the fight. Then there was a period of confusion while the waves sorted themselves out, the carriers went back to pick up their loads again while the others went forward. That was something which would be sorted out in later battles.
The swampy ground at Nonne Bosschen turned out to be less of a problem than expected. The ground around the lips of the shell holes was fairly firm. Picking their way through, the attackers were able to make good progress.
One particularly stubborn machine gun crew, though, was slowing the advance of the 6th Battalion. Lieutenant Birks and Corporal Johnston rushed the pillbox. The defenders saw them coming and began throwing bombs in their direction, seriously wounding Johnston, but Birks was able to work his way toward the rear of the pillbox and seeing that the game was up, the defenders surrendered. For this effort Birks was awarded the Victoria Cross and Johnston the Military Medal.
Lieutenant Fordham of the 11th was killed while attacking a blockhouse and a machine gun inflicted some casualties, but the resistance crumbled fairly quickly on this front.
The 2nd Division encountered even less resistance than the 1st. As they advanced, they came across Germans sheltering in shell holes. The Germans mostly surrendered without firing a shot. The 20th Battalion from New South Wales passed through the remains of a hedge and found a platoon of enemy scrambling to their feet with bayonets fixed. But such was the speed of the advance that the Germans seemed too surprised to put up any sort of resistance and were relieved of their weapons and sent to the rear after eight of their number were killed.
Machine gunners caused the 20th to slow down, but they were able to work their way forward to within bombing distance and soon put the guns out of action. They now had to face the Hannebeek Swamp.
It was 100 yards across and boggy. Progress would be slow, but they had planned for this and the creeping barrage slowed its advance, which according to Captain Henwood of the 10th, meant the Battalions were able to pick their way through the marshy country.
The 25th Battalion from Queensland and the right flank of the 20th went straight through the swamp. They could see the flash from German machine guns under the barrage and Lewis gunners provided covering fire for the bombers who were able to silence the Germans. The objective was just behind this position and was reached without any serious fighting.
The left flank of the 20th faced a more formidable defence. Near the start of their advance, they came across a line of old concrete shelters. Unlike in other sectors, the garrison was able to emerge from the barrage before the Australians were on them and some savage fighting followed.
Bean makes an interesting observation here. The garrison of these strong points consist of those of ‘weaker spirit’, and some braver men. At one point one of these weaker men came out with his hands up. One of the braver ones wasn’t ready to surrender yet and fired between this man’s legs, wounding a sergeant of the 20th. This action condemned both the weaker and braver members of the garrison.
A Lewis gunner called out, “get out of the way sergeant, I’ll see to the bastards.” At which point he fired into the crowd and killed or wounded most of the Germans, weak and brave together.
It reminds me of a list of Murphy’s Laws of Combat which used to hang around various military establishments, and probably still does. One of the laws was ‘never share a foxhole with anyone braver than yourself’. Given Bean’s account above, I’d say Murphy was pretty accurate.
Across the entire 1st and 2nd Division front the first objective had been seized by 6 – 6:30 am, pretty close the time set out in the timetable. Both Divisions, as well as the South Africans and British on their flanks, halted briefly to reorganise and prepare for the next phase. And it was a good thing that they did. On the 2nd Division’s flank, troops of the 1st Division had become intermingled. The 1st Div troops had shifted north to avoid the worst of the barrage. But pretty much across the entire front small parties were mixed up and needed to sort themselves out. But this had all been planned for and so while this was happening the troops began to dig in while the artillery laid down a protective barrage.
The Intelligence Officer, Captain J D Rogers of the 3rd Brigade reported to the Brigade commander, General H G Bennett on the situation at this point. Quote: “I have just returned from a tour round the whole of our country and everything is absolutely tres bon. 9th Battalion just a bit disorganised … but all right now. They are now getting no machinegun fire from the enemy on the very front line, and will quite easily take the two final objectives and then will have enough men there to hold all the German divisions on the whole front.”
There was a problem though. The 9th Battalion might not be getting any machine gun fire, but that wasn’t the case along the entire front. Close to the line where the Brigades were ordered to stop and dig in, were the occasional untouched German pillbox. They were too close for the artillery to risk lobbing shells, which meant the garrisons were pretty much free to fire upon the digging Australians. This obviously had to be dealt with, and the only way to do that was with an infantry attack.
The junior officers on the spot led the way, even though it meant coming dangerously close to the fringe of the protective barrage. Any drop shorts would save the Germans the hassle of shooting them. Captain Appleby of the 18th Battalion and Sergeant Nipperess of the 20th were killed but Lieutenant Anthon of the 20th and four men managed to get in behind the pillbox and routed the 40 Germans inside.
After three quarters of an hour, it was time to get the show on the road again. The eighteen-pounders increased their rate of fire for three minutes as a signal to the infantry that it was time to go. At 6:45am, the Battalions tasked with the second stage began their advance to the Blue Line.
For the most part this second phase was even easier than the first. The value of a well-coordinated creeping barrage showed through with the infantry managing to arrive at the German defences before the garrison’s were able to emerge from their shelter. Only on a few occasions were they able to direct a few bursts of machine gun fire on the advancing Australians, before either being taken prisoner or forced to retreat. One officer described the German tactic as ‘fire a few shots and run away.’
Despite these accounts of the advance being easy, it pays to keep in mind this was still an advance across open ground against a dug in enemy. Men were still getting killed and wounded. “Easy” is a comparative term. But on the 12th Battalion’s front, they captured nine machine guns, none of which had been fired prior to coming into the 12th’s possession. This phase of the attack bought the 12th onto the edge of Polygon Wood, which would be the scene of the next major battle in the sequence of the Third Battle of Ypres. We will cover that next time.
During this second part of the advance a gap began to appear between the 12th and 10th Battalions. This was a dangerous thing because the gap contained a handful of pillboxes. If they were left untouched, not only would they be able to hold up the second stage, but they would be able to fire upon the third stage battalions as they came forward for their part in the attack. Lieutenant Vaughan of the 12th recognised this danger and led an attack into the gap. But Corporal Townsend realised that the Germans weren’t quite in position and so to prevent them getting to their guns he rushed forward and kept them suppressed until the rest of the platoon was able to catch up.
Men from the 10th Battalion managed to bridge the rest of the gap and a potential problem was sorted.
Lieutenant C. C. J. McCannllo of the 27th Battalion gave an account of this stage which is pretty typical. Quote “We struck a good few Huns but they were all in concrete dugouts, and only in one position did they open up a machine gun, and then they only had time to fire a few shots. In that position we got two machine guns.”
Again, exactly as planned, between 7:30am and 7:45am the send objective had been taken. Success had been pretty much universal and easy with just a few exceptions which Bean described as trifling. The only one he decided was worthy of comment, was at Black Watch Corner.
As had happened at the end of the first stage some fortifications were uncomfortably close to the advance troops attempting to dig in. The left company of the 5th Battalion faced a blockhouse about 150 yards to its front. Artillery was falling around the blockhouse, but not heavily enough to prevent the Germans from firing. Captain Moore led an attack against the position. Company Sergeant Major Collins took twenty men and worked around behind and the garrison signalled its intention to surrender. Captain Moore ran forward and was shot by one of the garrison. He was a popular officer and seeing him shot by men who were apparently surrendering set the Victorians off. They killed a few men and were only prevented from killing more by the intervention of their officers. In the end, one officer and fifteen men were taken prisoner and two machine guns captured. To prevent the post falling into enemy hands again, the 5th Battalion dug in forward of the position, despite the danger from the British barrage still falling around the area.
Again the advance halted for reorganisation prior to commencing the third stage, except this time the halt lasted two hours. During that time the Australians were subject to fire from higher ground to their front. Behind the 5th Battalion the 8th moved forward in preparation for their advance. They quickly sorted themselves out and then took cover in shell holes while they waited. Lewis gunners kept firing on the German positions, but for many of the men, this two hour wait seemed unbelievably long and unnecessary. But many of the officers were glad of the break, they needed the time to get organised after two rapid advances with many of their troops getting mixed up.
Now, every now and then while researching these battles you come across things which leave you shaking your head and wondering just how blokes can be so calm and normal in the midst of all this chaos. One such event occurred during this break. Having been more or less sorted out and organised, two of Colonel Wilder-Neligan storm companies sat back in their shell holes eating sandwiches and smoking German cigars. But to make things even more surreal, Wilder-Neligan detailed a few men to act as newspaper boys. They went around the various shell holes handing out copies of the Daily Mirror and Daily Mail which Wilder-Neligan had purchased before the battle, for this exact purpose. I mean who, when planning an attack, thinks to themselves, “I bet the lads will like a good newspaper somewhere around the end of the second stage.” It was probably a stroke of genius actually. Give the troops a bit of a distraction from what’s going on around them. A bit of mental smoko. But still, sitting around eating sangers, smoking cigars and reading the paper. It almost sounds like an idyllic picnic scene until you remember they’re in the middle of a battle.
So while those troops relaxed and others reorganised, the battalions of the 2nd Division moved forward from Westhoek for the final advance. German observers located in Polygon Wood and on Broodseinde Ridge saw the movement of troops and called down a barrage, but it was described as only being a shallow curtain, which is fair enough. The Germans had just been pushed back and there would’ve been a degree of disorganisation and uncertainty of exactly where their own troops were. Laying down a full barrage could just as likely destroy German units still holding onto their positions.
From Westhoek the Australians could see where the barrage wasn’t falling and the section commanders led their men through, almost unscathed. The three battalions, the 28th from Western Australia, the 26th from Queensland and Tasmania and the 17th from New South Wales, arrived at the Blue line in ample time, with few casualties, and were in good condition for the third and final phase.
At 9:53 the Allied barrage once again increased its intensity in front of the Blue Line. But now there was a problem. They were working off the plan which detailed where the advancing battalions should be. But remember, many of the infantry had been obliged to push a little further forward to take care of problematic pill boxes. This meant that some of them were now under their own barrage. The troops occupying Black Watch Corner were forced to high-tail it just as the advancing battalions were beginning to work their way forward.
Over on left, the 17th Battalions objective for the third stage was Garter Point. Only problem was, the 18th had already taken it during the second stage. The 17th couldn’t believe there was nothing for them to do, so they advanced beyond Garter Point but three of their companies ran into the barrage and suffered casualties.
The start of the third phase was a bit of a shambles and if the German defenders had been organised and resolute, they could’ve inflicted quite a bit of damage. Fortunately though, the barrage was effective in neutralising most of the German strong points and knocked the defenders around a fair bit. As the line advanced the Germans seemed rather willing to surrender. The Australian’s main problem was in keeping up with the barrage, while dealing with the prisoners. Occasionally they advance too quickly and walked into their own barrage. Then they had to fall back, wait for the shelling to move on and then go forward again.
By 10:15 the advance was completed, except in the centre where some of the 1st Division were held back by their own artillery. The gunners were requested to extend their range by 200 yards and the last of the Australian troops occupied the Green Line. As happened in the first two phases, the advance bought some sections uncomfortably close to pillboxes which were just outside the scope of the advance. But again, section commanders took troops forward to seize the strong points. At one point, Lieutenant Errey of the 8th decided he could do it on his own, so stalked his way forward and captured a Bavarian battalion commander, his adjutant, 30 men and two machine guns.
The enemy seemed to be crushed. The Australians were digging in in full view of the Germans, but there was barely a shot fired in their direction. Lewis gunners were deployed forward in shell holes to provide cover while the new front line was constructed.
A constant problem for all armies throughout the war was communication with front line troops after an advance had been made. Smoke and dust obscured the view of observers and phone lines were still be taken forward. This wasn’t such a problem after the first wave as it was only a short distance and news of the advance made its way back rather quickly. But as the infantry pushed deeper during the second and third waves the Brigade and Divisional Commanders were denied timely updates as to the progress. Even after 10am, as the third wave was successfully making their advance, the commanders believed that Black Watch Corner was still in enemy hands. It wasn’t until they received a sketched map from a reconnaissance pilot at 11:25 that they became aware that all objectives had in fact been taken almost exactly according to plan.
But as had been proven on numerous occasions throughout the war, no attack would be allowed to settle in without having to deal with a counter attack. The Australians were preparing in all haste, but the battlefield was almost quiet. No sign of the enemy could be seen on the battlefield, apart from the occasional shot from a sniper or observers from the next ridge. The speed of the advance seemed to have knocked the Germans off balance. It wasn’t until nearly two hours later that the first signs of German guns being lined up was seen.
The infantry were seen assembling at Cameron Covert and around the Butte. The British barrage which was still falling, moved its attention to these locations and scattered the gathering troops. At 1:48 pm, after working hard for over eight hours, the barrage finally ceased. A comparative hush fell over the area. The Australians knew that it wouldn’t last long. A counter attack was imminent and when it came, the artillery would once again send its shells over. The only question was, when.
Interrogation of prisoners indicated that one attack would be launched from Cameron Covert and the Butte against the 1st Division while the 2nd Division would be attacked from the south at Zonnebeke. Shortly after 2pm German troops began to appear from these areas. At 2:40pm a report from the observer of the 2nd Division artillery reported, ‘Huns dribbling across from mound to cemetery in threes and fours. Our men souvenir hunting in Polygon Wood.’ The artillery opened up and it was on again.
At 3:15pm, the infantry fired SOS flares, but the artillery was already making a mess of the German attack. Shortly after, the observer again reported movement but stated that this appeared more confusion than anything else. German artillery attempted to support the attack, but most of their shells were falling to the rear of the new Allied front line. Most Australian casualties from the bombardment occurred in the rear areas.
The Germans made further attempts at 6:30pm and 7pm, but the Allied artillery had the area pegged to an inch. As soon as counter-attacking troops were seen, front line troops would fire flares which would bring the full weight of the artillery pouring down onto the Germans. No counter attack successfully made it to the Australian lines. By 8pm shellfire from both sides had ceased. The Battle of Menin Road had been fought and won.
For Allied soldiers who had endured months of bitter fighting on the Somme in 1916, this quick, effective victory boosted morale out of sight. Maybe, finally, the Generals had figured out how to fight this war. Quick, decisive battles with limited objectives, consolidate and then repeat. There was hope that the war could be bought to a successful conclusion without the horrors of 1916.
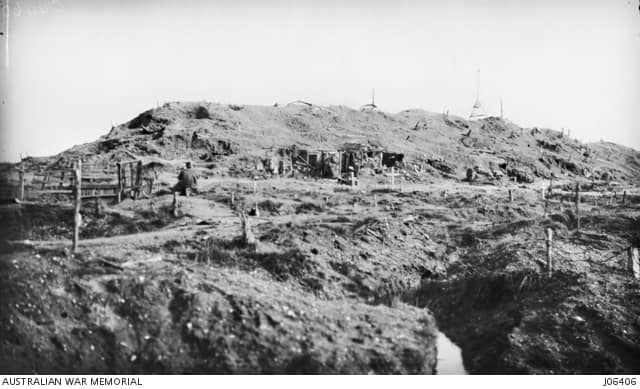
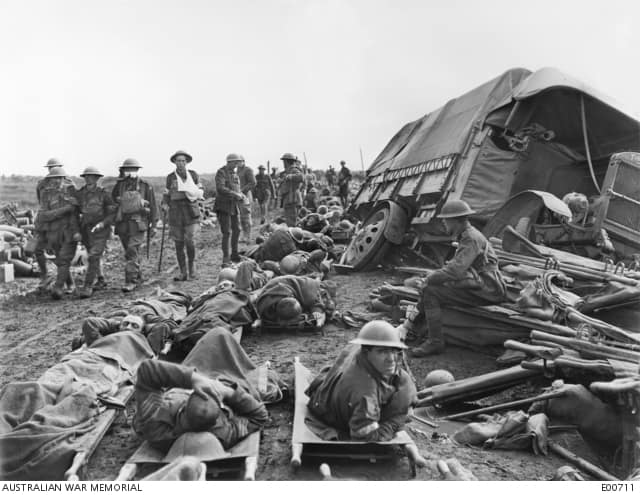
But in what is always a sobering thought, this comparatively easy victory still cost Australia 5013 casualties across the two Divisions. Total Allied casualties were estimated at 20 – 25000. German casualties are thought to be about 25 000 killed, wounded and taken prisoner.
Nevertheless it was an amazing victory. But it was only one part of the overall Third Battle of Ypres. Still ahead for the Australians was Polygon Wood and Broodseinde which we will cover in the next couple of articles.
Other military items by the author, Warwick O’Neill, can be found at: https://www.australianmilitaryhistorypodcast.com/
You can read more about the author, Warwick O’Neill, here.
