
Warwick O’Neill, Military Historian
“Take that damned thing away and let me see it for the first time in half an hour.” The immortal words of General Charlie Cox of the 1st Light Horse Brigade in the mid-afternoon of 23rd December 1916. He was referring to a direct written order from the Commander of the Anzac Mounted Division, none other than Harry Chauvel, ordering the withdrawal of troops from the attack on Magdhaba, Egypt. The Corps had been attacking all day without success and Chauvel, fearing that horses and men would soon run out of water had ordered the withdrawal. ‘Fighting’ General Cox had other ideas.
So what had led to this situation?
By December of 1916, British forces in Egypt under the overall Commander of General Sir Archibald Murray were on the verge of pushing the Turkish forces out of Egypt. They had held off a determined Turkish assault at Romani in August and now they were chasing the Turks across Northern Egypt. The Turks and their German advisors held the town of El Arish, near the coast on the Mediterranean Sea and because the British advance was determined by the rate at which they could build the railway and water pipes need to supply them, the Ottomans could predict where and when the next attack would fall.
At El Arish they had three options, they could launch a pre-emptive strike against the British in the hope of causing some havoc and a delay in their advance. They could sit tight and put up a spirited defence with little chance of success. Or they could switch off the lights, organise to have their mail forwarded to a new address, hand the key back to the landlord and get out of town.
After some debate, they chose option three and orders were issued for the 7000 plus garrison of El Arish to withdraw to a better defensive position in the vicinity of El Shallal. In order to buy some time for the setting up on this defensive position, about 1000 troops were ordered to garrison the village of Magdhaba, joining the 300 troops already there, and set up defensive redoubts around the town. The garrison was under the command of Khadir Bey.
Five redoubts were already in place around the town, remnants of previous conflicts, however numerous sandstorms had filled in the positions and the trenches which linked them. Orders were given to dig out the sand, but when the British forces arrived six days later, the digging was incomplete.
The reason the British forces took nearly a week to arrive was that they were unaware that El Arish had been abandoned. Plans were made, troops were organised and ammunition and resources bought forward before an attack on El Arish could commence. Then, when the Desert Column eventually moved to take the town, they were somewhat surprised to find it empty.
After a bit of head scratching and reconnaissance they figured out the Turkish presence at Magdhaba. The following day, orders were given to Chauvel to take the Anzac Mounted Division, and the Camel Corps to clear the Turks out of Magdhaba. This meant the Corps would be fighting 23 miles away from their only supply of water. It would have to be a rapid victory, or else it would need to be called off and the defeated soldiers would make their way back to El Arish to avoid risking the Corps dying of thirst.
At Romani back in August, Chauvel had used that fact against the Turks. He managed to hold them off long enough for heat and exhaustion to compel them to abandon their attack. It worked perfectly. Now he was the one facing the necessity of a quick win.
At his disposal Chauvel had three brigades of the Anzac Mounted Division; 1st Light Horse Brigade, consisting of the 1st, 2nd and 3rd Light Horse Regiments, the 3rd Light Horse Brigade, 8th, 9th and 10th Light Horse Regiments, the New Zealand Mounted Rifles Brigade being the Auckland, Canterbury and Wellington Mounted Rifles Regiments, together with three battalions from the Imperial Camel Brigade in place of the 2nd Light Horse Brigade. These Brigades were supported by the Inverness and Somerset Artillery Batteries, Royal Horse Artillery, and the Hong Kong and Singapore Artillery Battery.
After a quick appraisal of the Turkish defence Chauvel was ready.
At 06:30am on 23 December, No. 5 Wing of the Australian Flying Corps attacked the Ottoman defences and although their attack achieved little in the way of damage or casualties, they drew fire from the redoubts which revealed useful information for the attacking forces.
The initial attack was to be made by the New Zealand Mounted Rifles Brigade, consisting of the Canterbury Mounted Rifle Regiment and the Wellington Mounted Rifle Regiment, with support from a machine gun squadron armed with Vickers and Lewis guns, and the 3rd Light Horse Brigade. All were under the overall command of Brigadier General Edward Chaytor of the NZ Mounted.
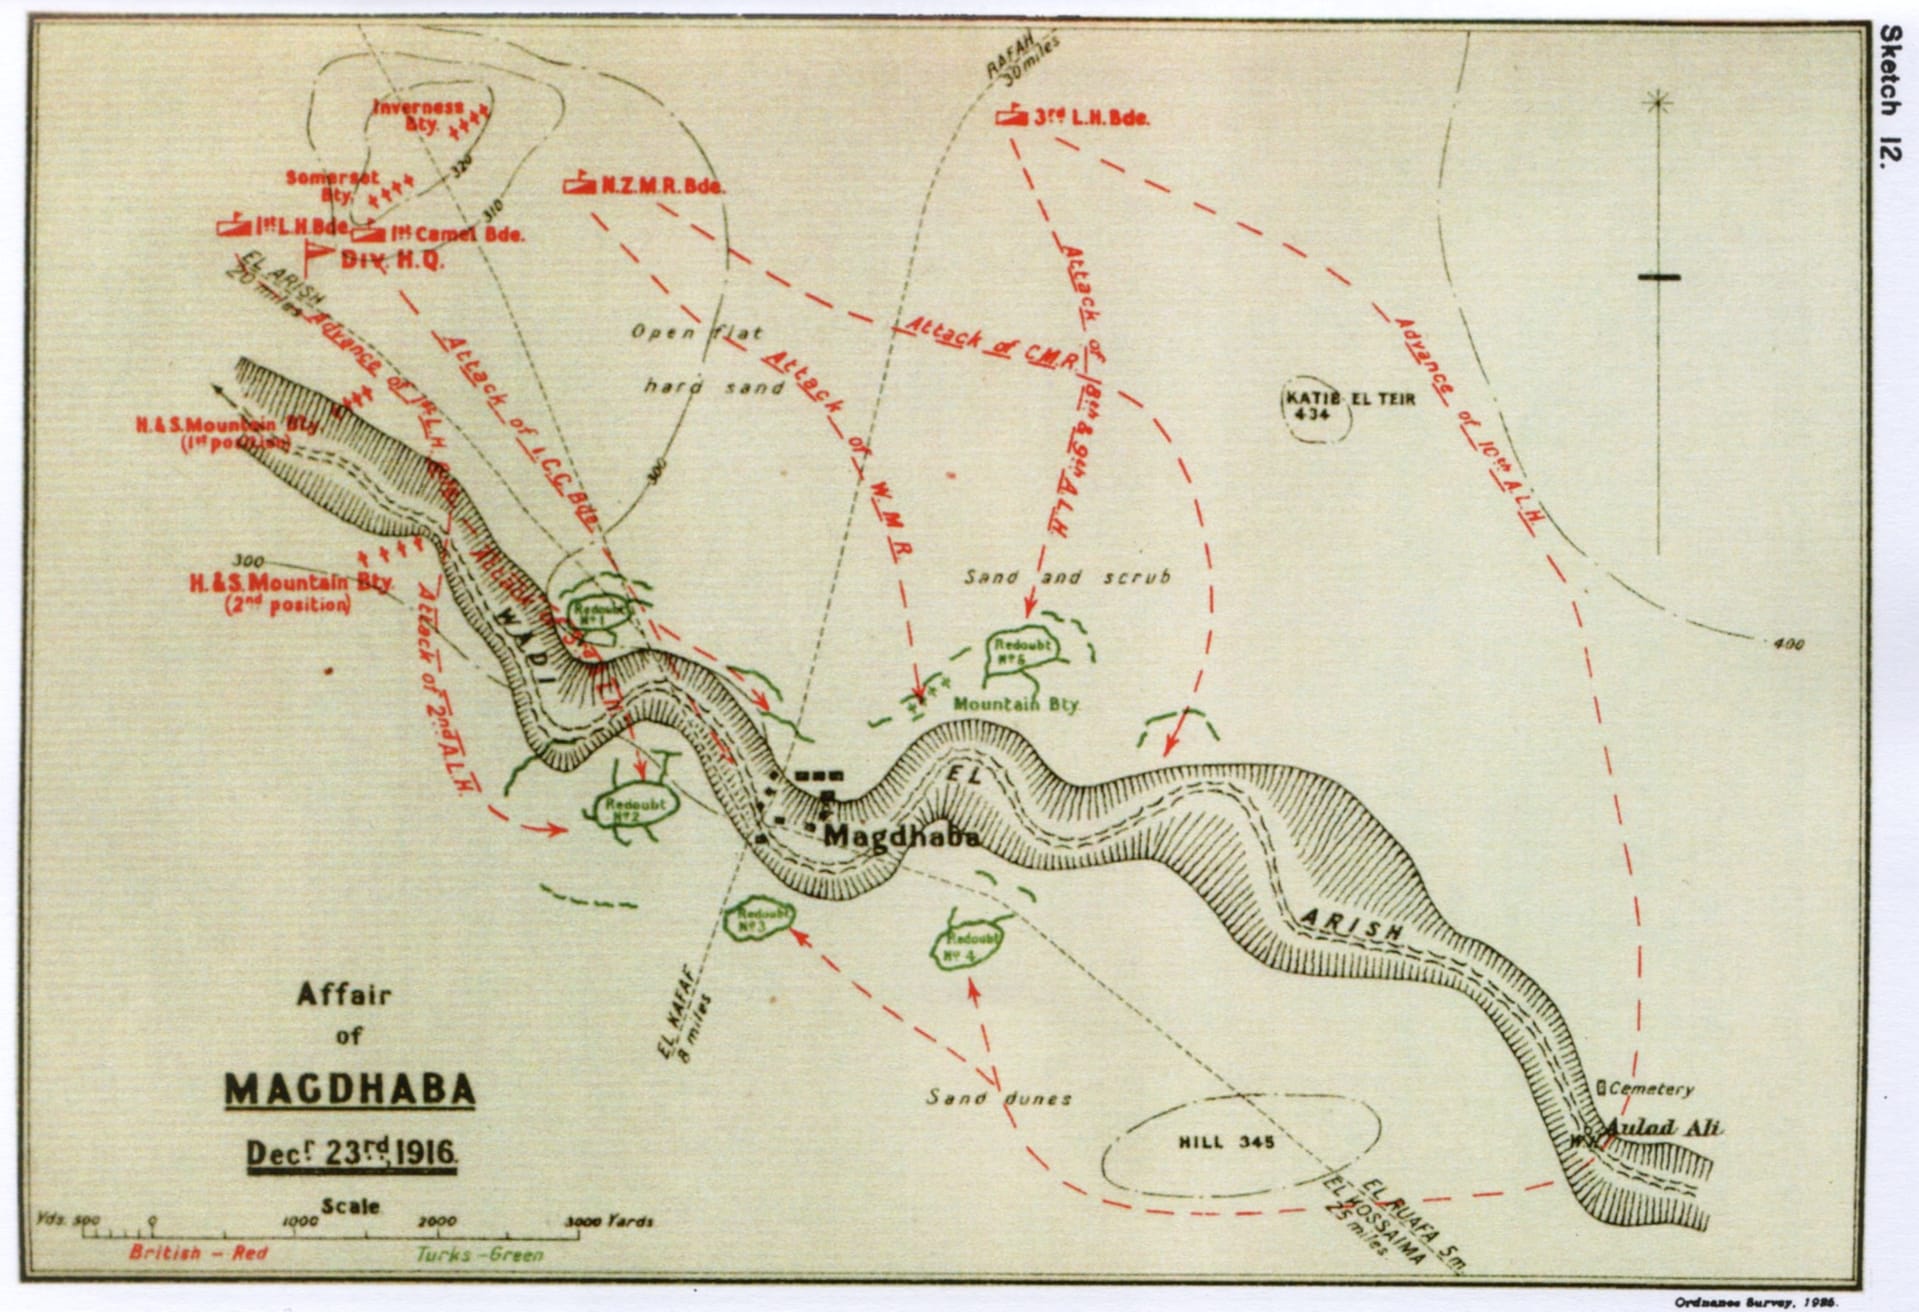
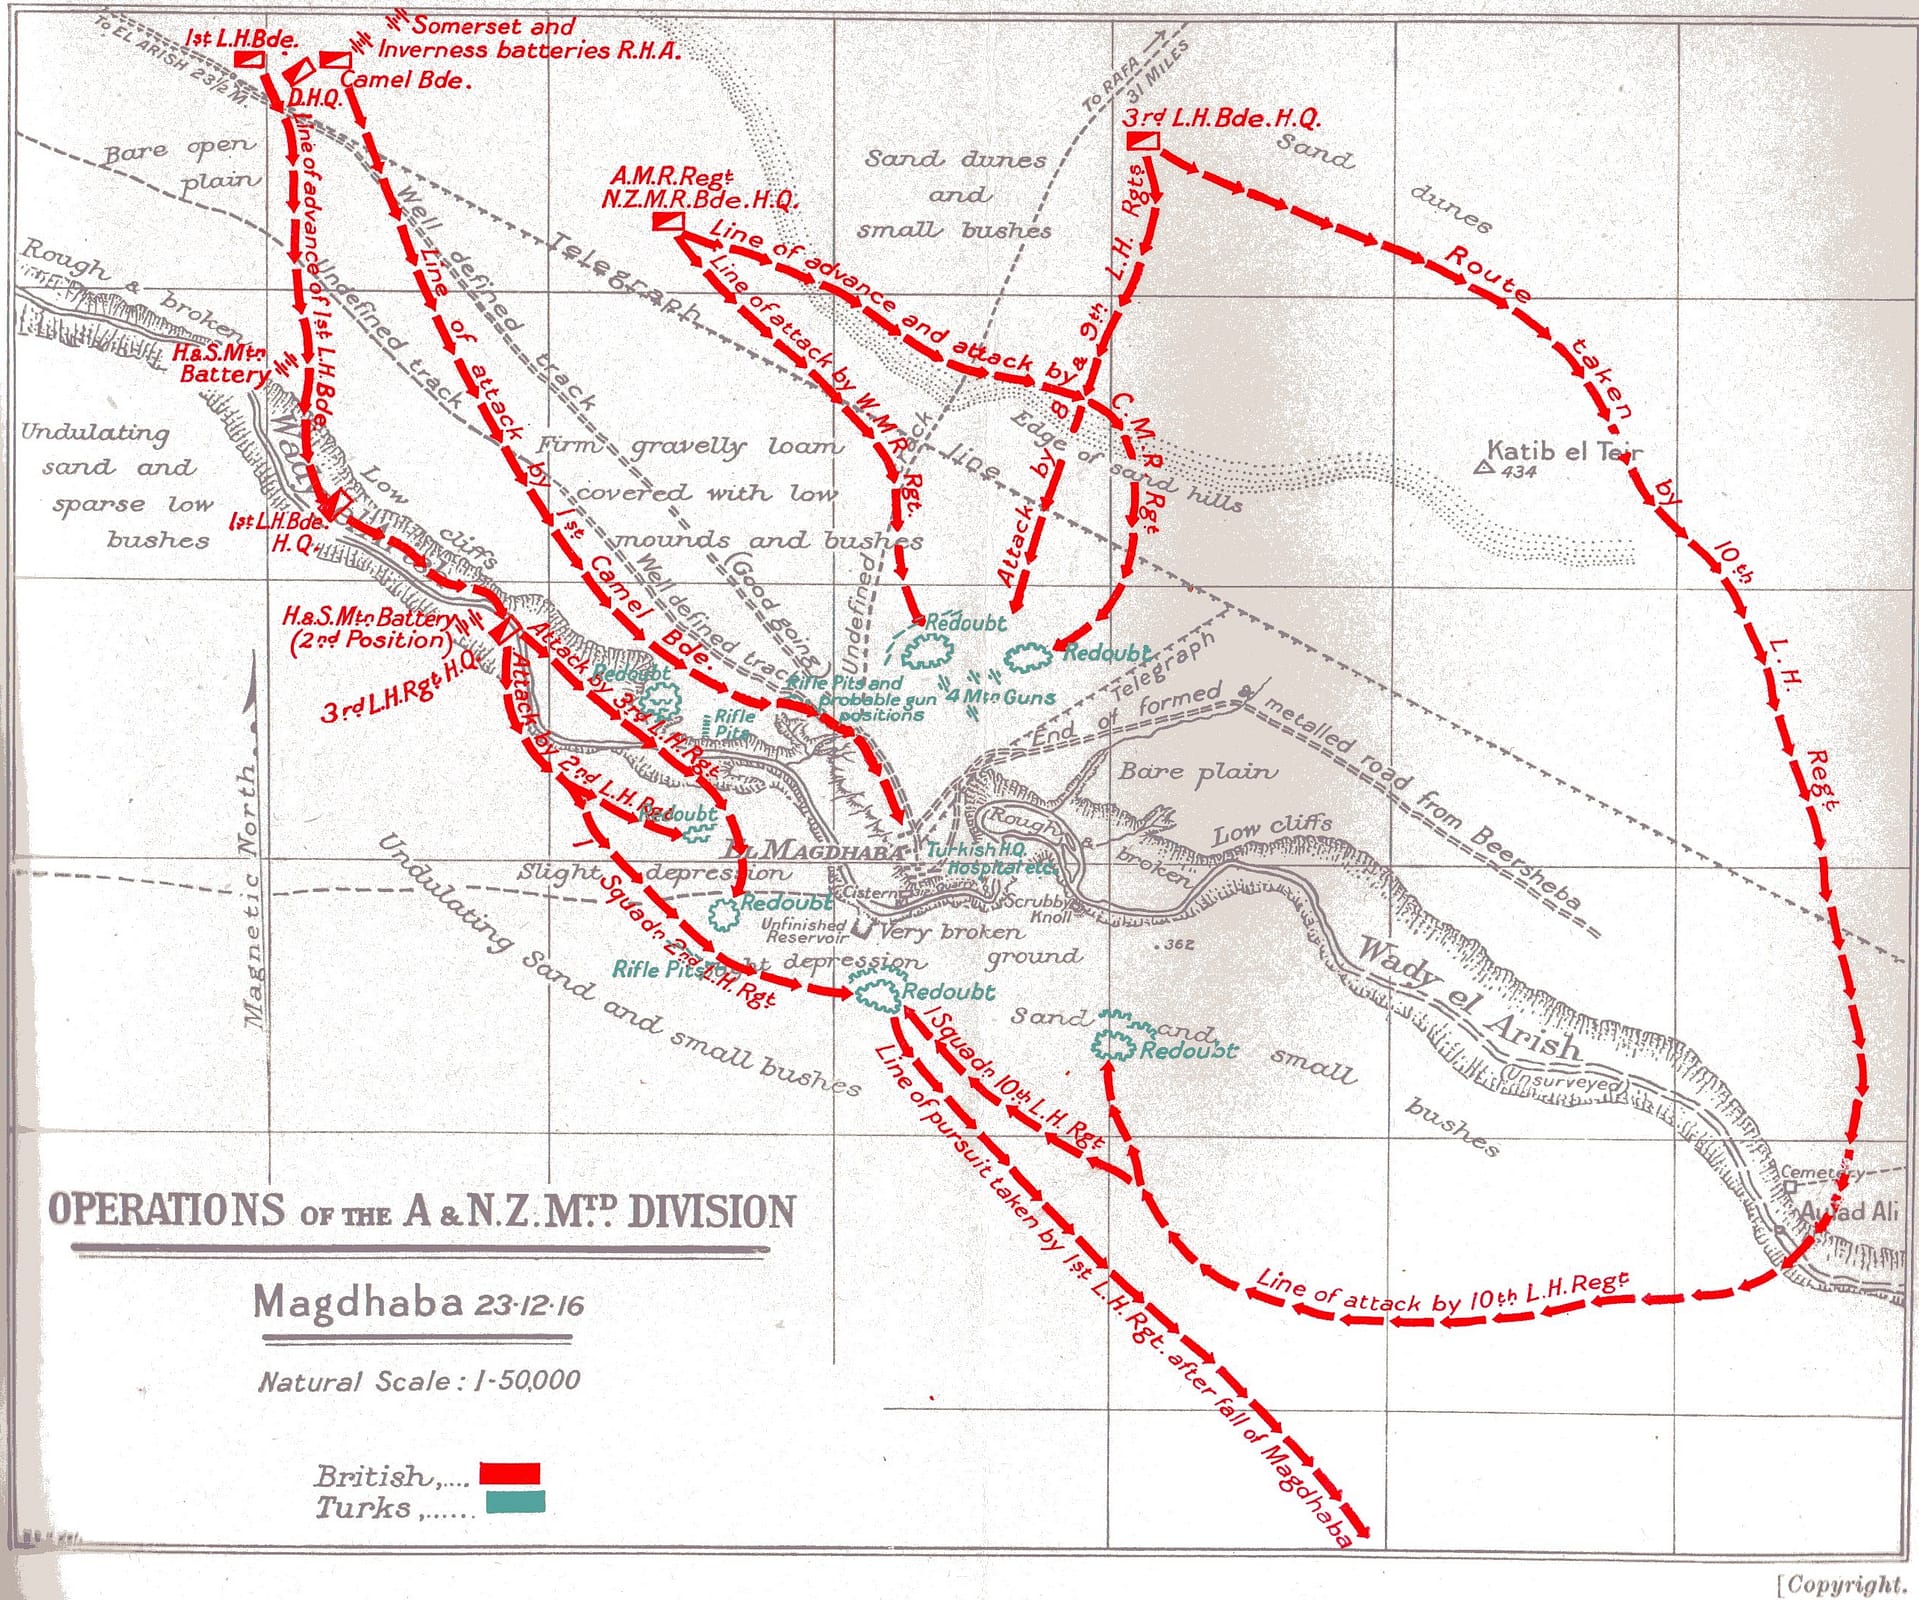
The Canterbury’s attacked to the South West, aiming at Redoubt 5, while the Wellingtons advanced south of the Canterbury’s and turned to take on Redoubt 1. The 10th Light Horse began a long encircling manoeuvre around the east with the intention of hitting Redoubt 4 from the south and to cut off any Turkish attempt to retreat. The Imperial Camel Brigade was to move straight onto the town of Magdhaba itself, sneaking between Redoubts 1 and 2.
The 1st Light Horse moved forward in reserve.
Despite heavy Turkish fire, the troops attacking redoubts 1 and 5 managed to get to between 1600 and 400 yards of the redoubts where they were forced to dismount and continue the attack on foot.
After receiving reports from aerial spotters that small groups of defenders were beginning to retreat and believing that this meant the garrison was about to fold, Chaytor ordered the 1st Light Horse Brigade to advance on the town during which maneuverer they overtook the Camel Corps. They soon came under heavy fire and were forced to dismount and take cover in the Wadi.
The garrison was still very much in position.
The main problem with Chauvel’s plan of encirclement was that he didn’t have enough troops to effectively encircle the entire position. It also meant that his forces were spread out and attacking at points all around the perimeter rather than concentrating on one point. Attempting to advance on foot, without being able to apply full force of attack meant that things progressed slowly. By midday all units were heavily engaged, but still a long way from achieving their objective. Such a long way in fact, that Chauvel was starting to get a bit nervous.
Fighting continued on all fronts with the Camel Corps pushing to within 500 yards of Magdhaba and the 2nd and 3rd Light Horse pressing on Redoubt 2. The 8th and 9th Light Horse were still pushing towards redoubt 5 and the 10th Light Horse had completed its wide arc and were fighting hard towards Redoubt 4.
But by 2pm Chauvel realised they were in a spot of bother. At 2:50 pm he sent out the following order:
As enemy still hold out and horses must be watered, the action will be broken off and the Force withdrawn. Each Brigade will be responsible for its own protection during the withdrawal. Hour of withdrawal to begin at 15:00.
So that was that. After a hard day’s fighting, the game was up and they were to withdraw, for no result. A bitter pill to swallow. But as it turned out, the Commander of the 1st Light Horse Brigade didn’t like taking his pills.
“Take that damned thing away and let me see it for the first time in half an hour.” Fighting Charlie Cox was reported to have said as the messenger carrying Chauvel’s order strode up.
I’ve perused the official diary of the 1st Light Horse Brigade and I can’t find any mention of this. But I wouldn’t, would I? Only an idiot would record such an act of disobedience in the official unit diary. Did it happen like that or was it just a myth that spread as these things tend to do? Either way, it doesn’t really matter. The fact is that, around the time this message would have been delivered, Cox had ordered one last push by his troops. It is quite likely that he did ignore the order, but whether he muttered those words, I haven’t been able to confirm.
However, the official Unit diary of the 3rd Light Horse Regiment, part of Cox’s 1st Light Horse Brigade, states, and I quote “bayonets were then fixed and a rush made and No 1 Redoubt taken at 13:40.” That’s 1:40 in the afternoon for anyone unfamiliar with the 24 hours clock. The observant among you will notice that according to the 3rd Light Horse at least, the redoubt was taken just over an hour before Chauvel is said to have issued his withdrawal order. Take your pick.
Regardless of when, and under what circumstances, Redoubt 1 was captured by B and C Squadrons of the 3rd Brigade, with help from the Camel Corps. The capturing thereof broke the defensive ring around Magdhaba. B and C Squadrons were able to set up their machine guns in the position and bring direct fire to bear on Redoubt 2 which was being assaulted by A Squadron with assistance from elements of the 2nd Light Horse.
Redoubt 2 fell around 4 pm and the Turkish Commander Khadir Bey was captured.
Over on the Eastern side, the New Zealanders and the 8th and 9th Regiments of the 3rd Light Horse Brigade continued pushing toward Redoubt 5, while the 10th Light Horse took on Redoubt 4.
From the diary of the 8th Light Horse – “After driving in enemy outpost and snipers, the E Redoubt (No. 5) was stormed by B Squadron, 8th Light Horse and a small party of the 9th. The latter’s Lewis Gun rendered very valuable assistance during the advance. The whole of the enemy in this position were either killed or captured. In the meantime, C Squadron under Major Crawford had advanced on the left of B Squadron and had over run the enemy’s gun position, capturing 4 9pounder mountain guns.”
From this point, the Turks could only mount a feeble defence and soon, realising the hopelessness of their position, the Magdhaba garrison surrendered. With the town taken, the Allied Troops could water their horses, attend to their wounded and organise the movement of their prisoners. Chauvel had succeeded but it had been a close call.
Turkish casualties for The Battle of Magdhaba amounted to 97 killed and 300 wounded as well as 1,282 captured. The ANZACs and the Camel Corps suffered casualties of 22 killed and 121 wounded.
With the capture of Magdhaba, British Commonwealth forces were able to continue their push across the Sinai towards Palestine. With the completion of the railway and pipeline, the allies were able to commence operations against the Turkish lines around Gaza throughout much of 1917, culminating in the Battle of Beersheba in October.
It was at Beersheba where Chauvel faced a similar situation to Magdhaba. His forces were attacking miles from their only water source, the town needed to be captured in one day and, like Madhaba, progress throughout the day was too slow. Brigadier Grant proposed charging the town in what would become the famous charge of the Light Horse. Chauvel had no hesitation in sending Grant and his men into the attack, confident that they could succeed. Even after protests from other commanders he persisted. Maybe Cox’s attack that allegedly turned the tide at Magdhaba was forward in his mind.
Maybe that was the greatest achievement of Magdhaba.
To listen to the podcast of this item, go to: https://play.acast.com/s/australian-military-history or wherever you get your podcasts.
Other military history podcasts by the same author can be found at: https://www.australianmilitaryhistorypodcast.com/
You can read more about the author, Warwick O’Neill, here.
